Second Pipe Completed-A tilted billiard?

Want to show you work to the world? Want a place to post photos of your work and solicit the opinions of those that have gone before you? Post your work here.
Post Reply
ewgilmore
Posts: 3
Joined: Tue Jun 24, 2014 3:10 pm
Location: Central Florida

Second Pipe Completed-A tilted billiard?

Post by ewgilmore »

Good afternoon gentlemen,

Firstly, please forgive any mistakes or typos as I am uploading from my phone. Second, this is a pre-drilled pipe from PIMO so I would like some feedback/advice more about the finishing and shaping of this pipe. This was my first time dying a pipe and it looks a little strange to me. It could be the inconsistent grain? Also, there is a vertical line on the broadside with the flame grain that I couldn't sand out. The briar also has multiple flaws. Not a great pipe, but it's a next step in a long journey of pipe making. I sanded 60 grit sandpaper to, 320, 400, 600, 1000, 2000. Red polishing compound. Then buffed with carnauba.

Image
Image
Image
Image

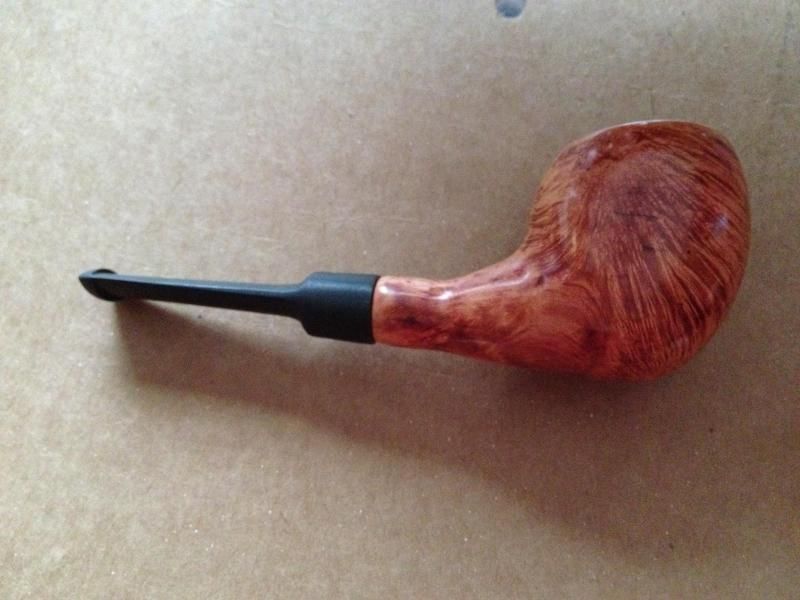
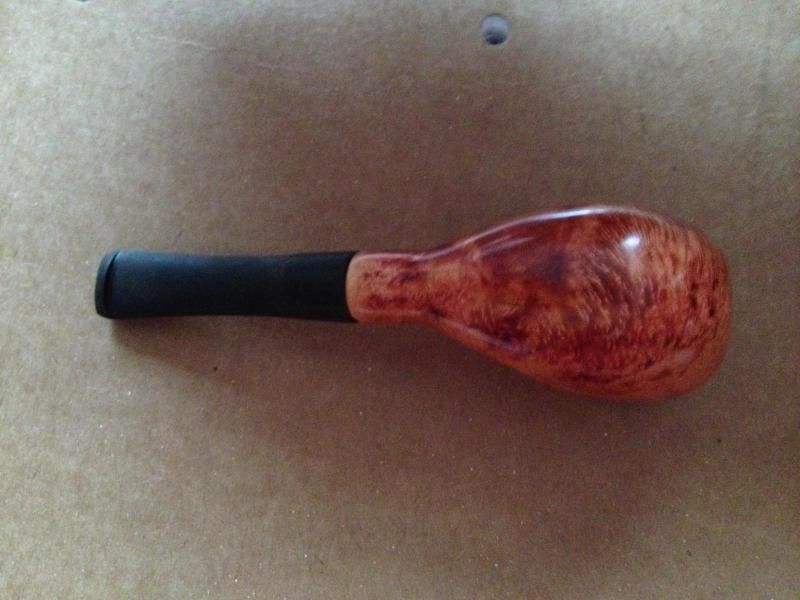
I appreciate any comments and could post additional photos if requested. Thank you.
Last edited by ewgilmore on Tue Jul 29, 2014 9:03 am, edited 1 time in total.
Grace and peace,

Ethan Gilmore
User avatar
Joe Hinkle Pipes
Posts: 804
Joined: Tue Feb 15, 2011 1:39 am
Location: Lafayette Indiana
Contact:

Re: Second Pipe Completed-A tilted billiard?

Post by Joe Hinkle Pipes »

You can stop sanding the bowl at 600. Sand your stem up to 1000 to get it shiny and then buff. I would guess you are buffing too hard and removing too much stain.
User avatar
d.huber
Posts: 2691
Joined: Mon Dec 12, 2011 9:28 pm
Location: Durham, NC
Contact:

Re: Second Pipe Completed-A tilted billiard?

Post by d.huber »

I would recommend studying some billiards before your next attempt.
http://www.dshpipes.com

"Strive for excellence, not for what someone else accepts."
-Tyler Beard
ewgilmore
Posts: 3
Joined: Tue Jun 24, 2014 3:10 pm
Location: Central Florida

Re: Second Pipe Completed-A tilted billiard?

Post by ewgilmore »

Solomon_pipes wrote:You can stop sanding the bowl at 600. Sand your stem up to 1000 to get it shiny and then buff. I would guess you are buffing too hard and removing too much stain.
What would one buff the stem with? And I think you're right because it felt like after I applied the dye and sanded it off, I pretty much sanded back to nearly the natural color. Made it look really uneven. Thanks for the feedback.
d.huber wrote:I would recommend studying some billiards before your next attempt.
Yeah, true. I need to. I'm learning how patient you have to be with hand tools to develop those shapes. Thanks for the suggestion.
Grace and peace,

Ethan Gilmore
User avatar
Joe Hinkle Pipes
Posts: 804
Joined: Tue Feb 15, 2011 1:39 am
Location: Lafayette Indiana
Contact:

Re: Second Pipe Completed-A tilted billiard?

Post by Joe Hinkle Pipes »

buff the stem with the red compound you used on the bowl. if that is a premold stem that hasnt been touched i would sand at 320 400 and 600 then buff. it will look much better, and eventually you will have to tackle the business end of the pipe. might as well introduce yourself to it.
User avatar
Literaryworkshop
Posts: 275
Joined: Thu Feb 28, 2013 3:57 pm
Location: Alabama Gulf Coast
Contact:

Re: Second Pipe Completed-A tilted billiard?

Post by Literaryworkshop »

Just to clarify what's been said above, you need a powered buffer. Buffing by hand will take the rest of your life. A basic bench grinder or even a drill press can get you there.

You need to be more aggressive in taking off material where it doesn't belong. Most good pipes should look more delicate than that.

Here are my two suggestions:

1. Look at traditional shapes (or not-so-traditional shapes) and pick one that you want to make. Get that shape firmly in mind. The best way, I find, is to draw it. Draw it several times, either freehand or with some drafting tools like a straightedge and compass. When you have the target shape down, draw it out on your briar block, both top and side. Of course you'll get rid of your lines as soon as you start shaping the wood, but it will help you see where to begin.

2. Take your time shaping, and pay attention to how the whole pipe is shaping up. Keep your drawing(s) handy as you shape the pipe. Go right down to the lines and pay attention to details, especially to that pesky transition between the shank and stem. With a very few exceptions (e.g. a horn or calabash), the shank and the bowl should look like two distinct parts that transition smoothly into each other. A chainsaw file helps a LOT with this.
- Steve S.
ewgilmore
Posts: 3
Joined: Tue Jun 24, 2014 3:10 pm
Location: Central Florida

Re: Second Pipe Completed-A tilted billiard?

Post by ewgilmore »

Solomon_pipes wrote:buff the stem with the red compound you used on the bowl. if that is a premold stem that hasnt been touched i would sand at 320 400 and 600 then buff. it will look much better, and eventually you will have to tackle the business end of the pipe. might as well introduce yourself to it.
Awesome. I will be sure to do this. Thanks, again.
Literaryworkshop wrote:Just to clarify what's been said above, you need a powered buffer. Buffing by hand will take the rest of your life. A basic bench grinder or even a drill press can get you there.

You need to be more aggressive in taking off material where it doesn't belong. Most good pipes should look more delicate than that.

Here are my two suggestions:

1. Look at traditional shapes (or not-so-traditional shapes) and pick one that you want to make. Get that shape firmly in mind. The best way, I find, is to draw it. Draw it several times, either freehand or with some drafting tools like a straightedge and compass. When you have the target shape down, draw it out on your briar block, both top and side. Of course you'll get rid of your lines as soon as you start shaping the wood, but it will help you see where to begin.

2. Take your time shaping, and pay attention to how the whole pipe is shaping up. Keep your drawing(s) handy as you shape the pipe. Go right down to the lines and pay attention to details, especially to that pesky transition between the shank and stem. With a very few exceptions (e.g. a horn or calabash), the shank and the bowl should look like two distinct parts that transition smoothly into each other. A chainsaw file helps a LOT with this.
Thanks for the response! I actually have been using a dremel tool with buffing attachments to buff. I couldn't imagine buffing without at least that. I'd love to purchase a buffing wheel in the future but that'll be down the road. In response to your first suggestion: You are the second person to advocate drawing the shapes on a sketchpad. I will have to increase my drawing time. In response to your second suggestion: Very good advice! It's very helpful to think of the shank and bowl as two distinct parts. Also, I will look into a chainsaw file.
Grace and peace,

Ethan Gilmore
User avatar
PremalChheda
Posts: 1213
Joined: Sat Dec 11, 2010 6:03 pm
Location: Columbus, Ohio, USA
Contact:

Re: Second Pipe Completed-A tilted billiard?

Post by PremalChheda »

There are too many issues with basic craftsmanship to critique this pipe.

You may need some practice with file use and sanding on the next pipe you work on. Go slow and focus on a couple things.

1. Make a near to perfect cylinder on the shank.

2. Make sure you have a smooth surface with each grit of sandpaper before moving to the next.
Premal Chheda
http://www.chhedapipes.com - Just for fun
http://www.smokershaven.com - New & Estate Pipes
http://www.rawkrafted.com - Pipe Making Tools, Materials, & Supplies
User avatar
Ratimus
Posts: 337
Joined: Mon Jan 20, 2014 12:55 pm

Re: Second Pipe Completed-A tilted billiard?

Post by Ratimus »

Quick tip for a big improvement on the next one: sand the shank with the stem attached. That way you avoid those rounded-over edges at your shank/stem transition.
Ryan Richardson
R2 Pipes/Ryan's Luxury Goods
______________________________________
"You can't convince a stupid person that what he's doing is stupid, because the stupidness inside him is telling him that it's smart"
Post Reply