author
author
I tried to make an "author" style pipe. Criticism appreciated.
The last advice I got from you boys was very helpful. I've tried to incorporate the tips in the newest pipes.
I discovered a couple things that are probably obvious to you, but weren't to me. First, if I put the tobacco hole on a dowel rod, and spin the stummel while holding a pencil in a fixed location, I can mark the high points. This has helped me a lot in improving symmetry. Second, if I rotate the stem 180-degrees (or 90-degrees), I can see where the stem/shank junction isn't circular.
Lastly, since I have more pipes than friends , and since briar isn't free, I put up a website with hopes that I can sell some pipes. Criticism here would be appreciated too. I've aimed toward the beginning smoker market, since I'm a beginning maker, hence my possibly inaccurate and misleading advice.
http://ericpaulsonpipes.com
- baweaverpipes
- The Awesomer
- Posts: 947
- Joined: Tue Dec 19, 2006 8:07 am
- Location: Franklin, Tennessee
- Contact:
Re: author
Just for starters, there are a lot of sanding marks. Remove those.
Gap between mortise/stem.
- Sorringowl
- Posts: 219
- Joined: Sun Jun 06, 2010 12:30 pm
Re: author
Eric,
Firstly, bless your soul for actually posting a new pipe in the gallery and not adding to the madness that has become the Tilted Pot story
I am a beginning pipe maker myself but a long time furniture maker and finisher, so, take my comments with that in mind. As Bruce already pointed out, there are some sanding marks you need to get rid of. What is your method for shaping/sanding? What's the highest grit you are using and are you using methods to make your finishing work easier (wet sanding)? As a furniture maker/restorer I've learned to use methods that allow me to work smarter (not harder), especially when it comes to finishing. At first, this requires you to sometimes work longer as, you have to make sure you follow through each step before moving on to the next (especially with sanding grits), but after awhile, you learn it's much better to "do it once and do it right."
Concerning the gap at the stem/shank junction: have you countersunk your mortise opening and/or tenon end?
I also think your stems can use some refining on the sides near the button and have more of an oval shape, rather than flat (unless that's a design choice--still, I think it can use some more refining).
That said, I really like your website (I think it's laid out very well and easy to navigate) and your overall shaping on your pipes and I like that you're already using quality materials (like cumberland stems). I also really like that your prices are reasonable for a beginning pipe maker and that you include small but thoughtful touches with each of your pipes, like an included sleeve and a free handmade tamper (very nice touches).
I think you are already showing the right attitude and approach (which others could definitely learn from) and I, for one, will be watching your progress. Keep up the good work and thanks for sharing your work.
“When one man, for whatever reason, has the opportunity to lead an extraordinary life, he has no right to keep it to himself”
― Jacques-Yves Cousteau
Sorringowl's leather pipe accessories shop: http://www.sorringowlandsons.etsy.com
― Jacques-Yves Cousteau
Sorringowl's leather pipe accessories shop: http://www.sorringowlandsons.etsy.com
Re: author
Hi Eric,
A couple of more things:
-the transition between bowl and shank is too sharp, should have a bit of a radius, shouldn't be so sharp
-the shank is not straight in all areas, use a straight edge to check your straight lines
-the finish is a little uneven, the finish should be a little more refined
-selling pipes before getting the basics close to perfect is premature
That is all I can see that hasn't been laid out. You've got a good eye for shaping and composition, keep up the good work!
Re: author
Other than what's already been said, I have just one thing to add (and I'm super new to pipe making so take it with a grain of salt.) However, it looks like instead of bending the stem to get the curve, you filed the top down and not the bottom...I could be wrong about this though. It's probably just my personal preference, but I think it might look a little better if the stem was simply tapered down the the button and then heated and bent to the curve you are wanting.
With that said, though, you did make a nice looking pipe. The stain choice works really well with the cumberland stem. Nice job, man.
"No reserves, no retreats, no regrets"
"When you're dumb...you've got to be tough." - my dad
Re: author
Thanks for the replies.
100, and 220 disk
220, 320, 400 dry hand sanding
stain
red tripoli
white tripoli
carnauba
for the stem I use:
320, 400, 600, 800, then white tripoli
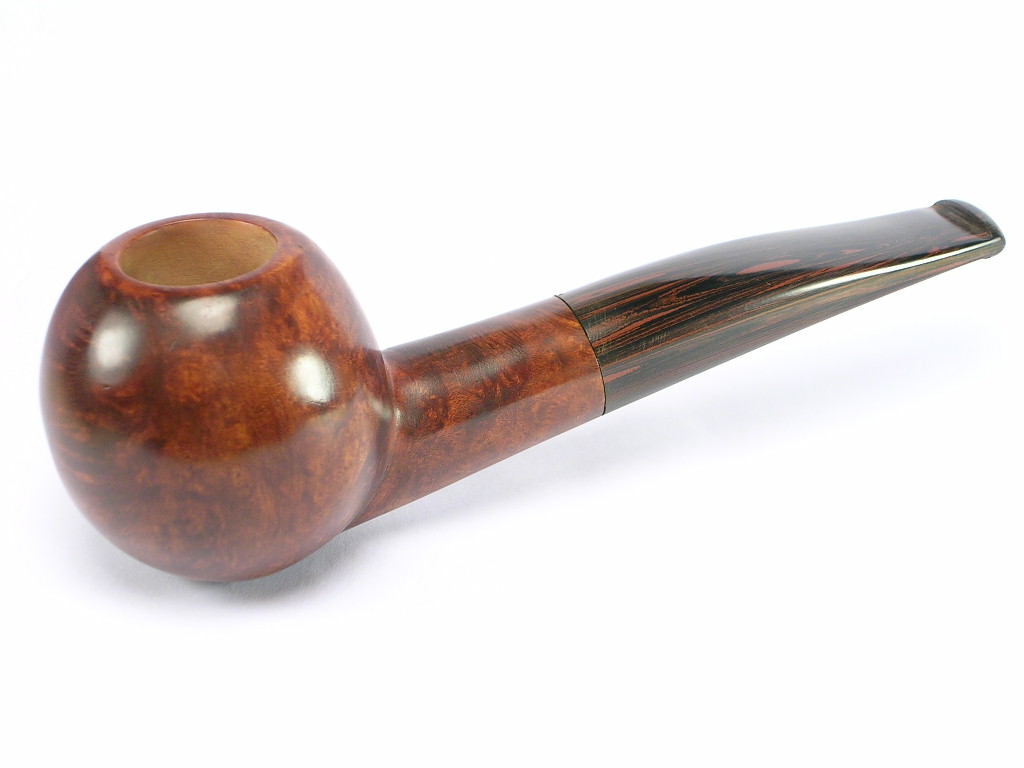
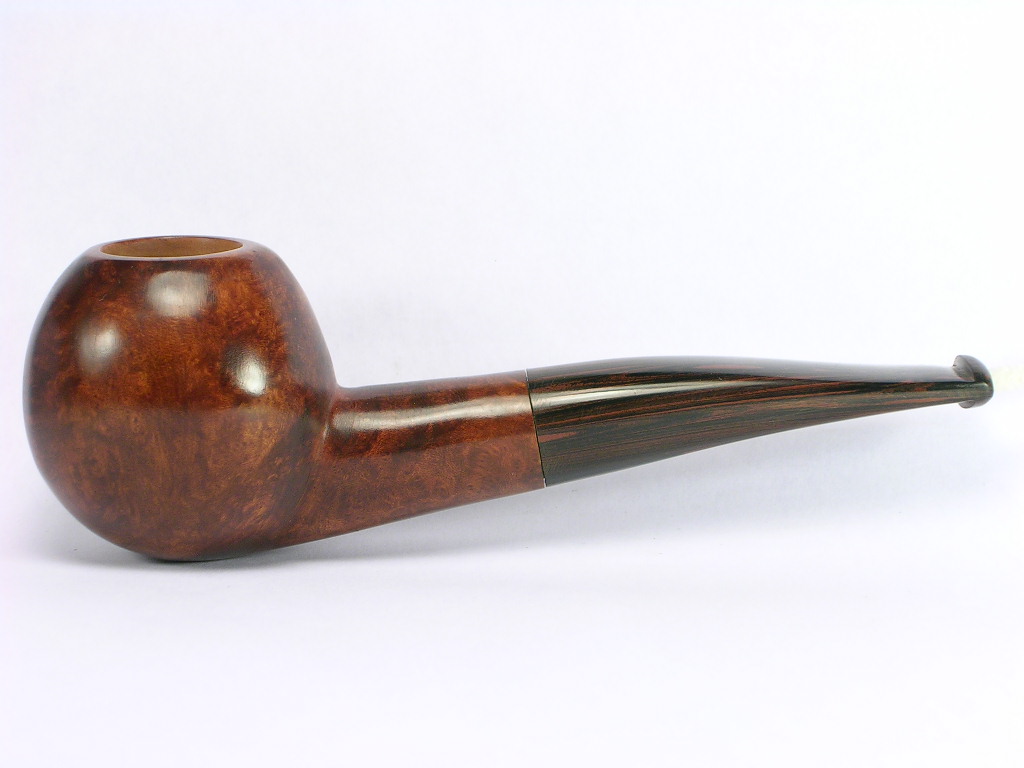
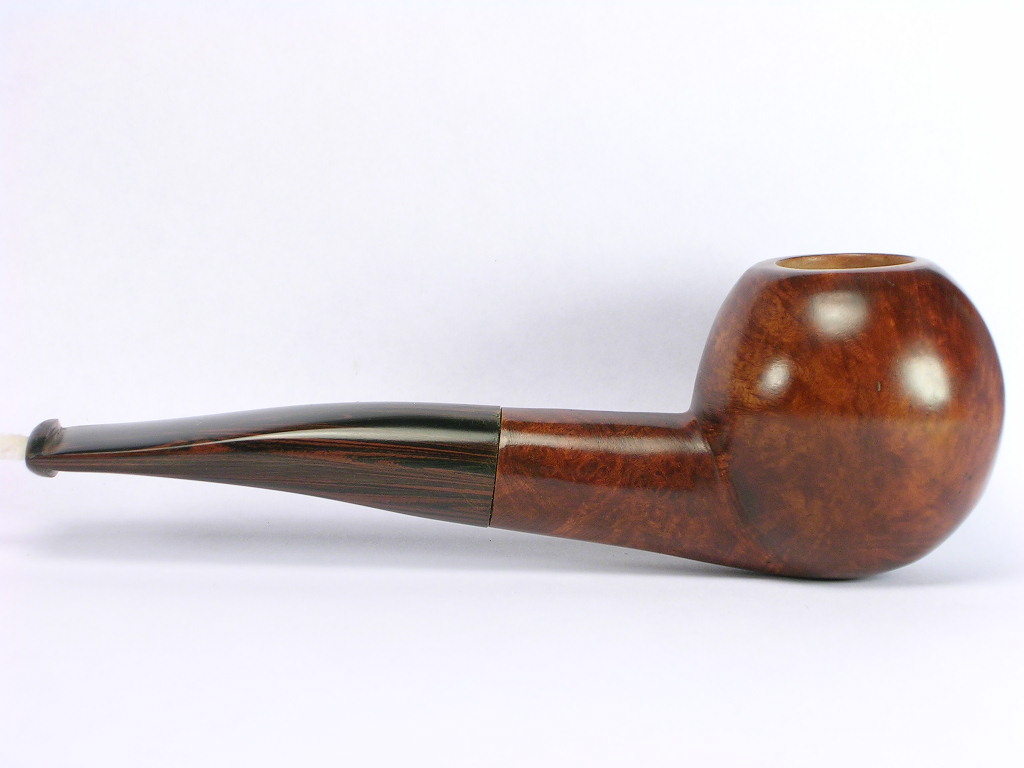
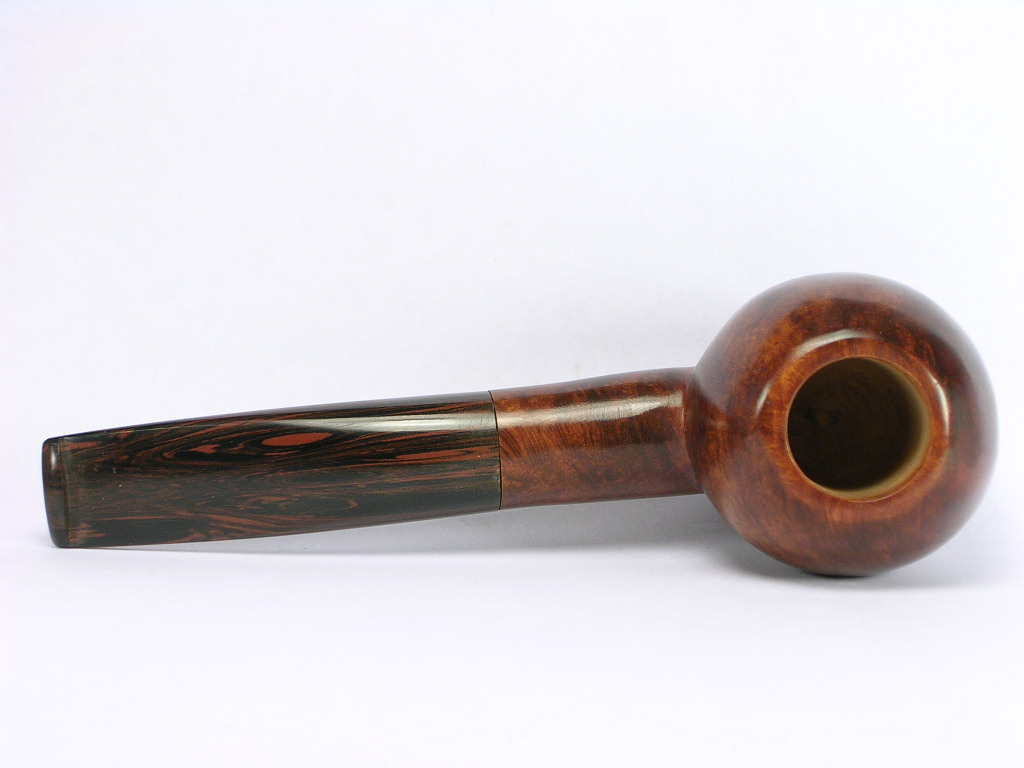
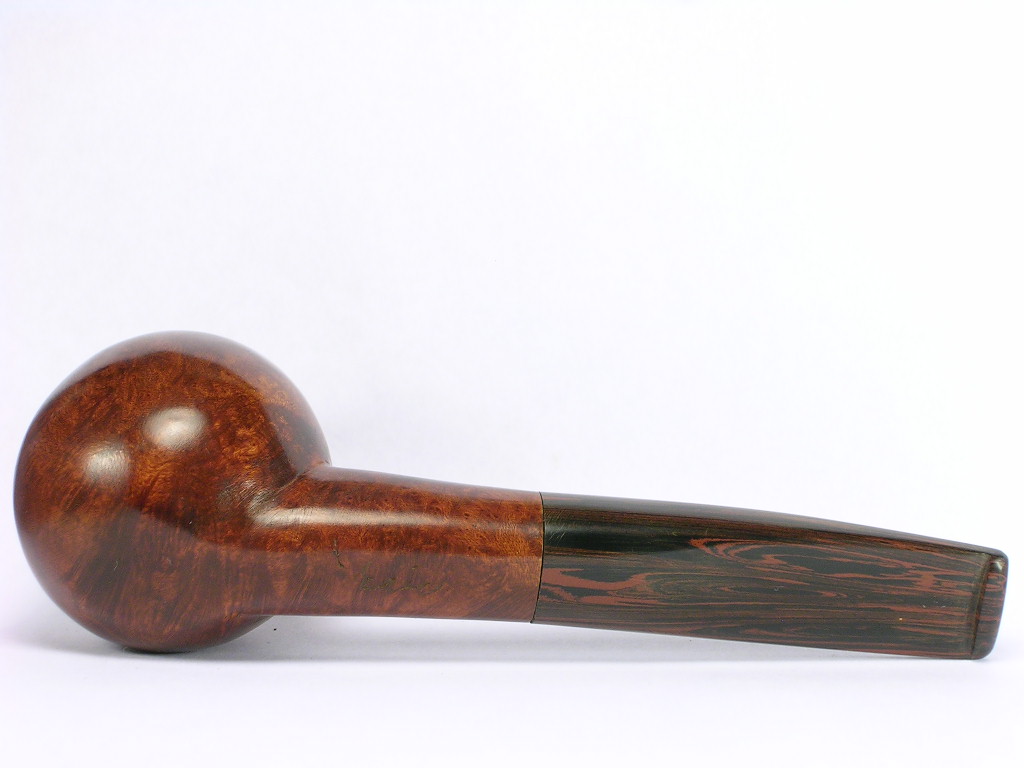
This is certainly an area I'm struggling with right now, so if you have suggestions, I'm all ears. My current procedure is:I am a beginning pipe maker myself but a long time furniture maker and finisher, so, take my comments with that in mind. As Bruce already pointed out, there are some sanding marks you need to get rid of. What is your method for shaping/sanding? What's the highest grit you are using and are you using methods to make your finishing work easier (wet sanding)? As a furniture maker/restorer I've learned to use methods that allow me to work smarter (not harder), especially when it comes to finishing. At first, this requires you to sometimes work longer as, you have to make sure you follow through each step before moving on to the next (especially with sanding grits), but after awhile, you learn it's much better to "do it once and do it right."
100, and 220 disk
220, 320, 400 dry hand sanding
stain
red tripoli
white tripoli
carnauba
for the stem I use:
320, 400, 600, 800, then white tripoli
I haven't countersunk the mortise. I didn't feel like it needed since I use a Delrin tenon, although I'm probably mistaken. I'll give it a try. I think lack of squareness is also a problem. I was going to try facing with a forstner bit.Concerning the gap at the stem/shank junction: have you countersunk your mortise opening and/or tenon end?
I was working under the assumption that sharper was better. I can certainly round things off a bit in the future.-the transition between bowl and shank is too sharp, should have a bit of a radius, shouldn't be so sharp
I actually agree with this, and although I wouldn't call what I do "close to perfect", I (perhaps mistakenly) thought it "good enough". At this point, I'm not going to remove my website, since the horse is out of the barn. I'm also guessing I can learn a lot by what does or doesn't sell.-selling pipes before getting the basics close to perfect is premature
I bent the stem, although I can see what you're saying.However, it looks like instead of bending the stem to get the curve, you filed the top down and not the bottom
Re: author
I think its a pretty nice pipe actually. Shaping is good and the stem work looks alright as well. As with anything you just need to practice. I can tell that you understand what you need to do that is obvious in your work, all you need to do is keep at it and you will see improvement in each pipe.
I also think you should sell them if you can, as long as they are drilled well etc then they are going to smoke better than most cheap basket pipes and they are not much more expensive. Your prices are about right for the quality and the money you will make will pay for more materials and tools.
Keep up the good work.
PS Love the website, very nicely laid out and simple to navigate.
- Sorringowl
- Posts: 219
- Joined: Sun Jun 06, 2010 12:30 pm
Re: author
Hey Eric,eric wrote: My current procedure is:
100, and 220 disk
220, 320, 400 dry hand sanding
stain
red tripoli
white tripoli
carnauba
for the stem I use:
320, 400, 600, 800, then white tripoli
Again, I've only made a few pipes and done some restos, so my actual finishing experience on pipes is limited but, from my furniture finishing experience I've learned that the higher you go up on the grits, the better your finish will look and the less scratch marks you will see. However, that being said, when going on to each higher grit, you have to make sure that your scratch marks from the previous grit are all removed. It takes a little while to be able to see this and it might help to lightly dab your stummel intermittently with a little bit of denatured alcohol so that the grain is more pronounced (and the scratch marks are easier to see).
Since a pipe is so small (say, as compared to a dining room table), the viewer's eye catches more flaws in its finish than they normally would if looking at a bigger, finished object. This is where patience and diligence comes in. You have to not move on to the next grit until you can see that all your sanding (scratch marks) from the present grit are even.
I would definitely say you need to go higher on the grits to get a quality finish (this goes for both your stummels and stems). I would definitely start wet sanding (using a very small amount of water or denat. alcohol) once you get to about the 400 - 600 grits and at about those same grits start using different grades of Pumice in conjunction with your wet sanding (to about 1200 grit). The higher grit you use, the more smooth of a finish you will start to see and with less effort (physically) expended on your part. As you go up in grits, you need to keep a light touch (the higher the grit, the lighter the touch) so that you're always letting the sandpaper do the work.
I would definitely trying going up to 1200 to 1500 grit (and I have gone up to 2500 grit) but perhaps some of the more experienced makers here, will share with you what they think works for them, grit wise.
You might also want to take some individual pieces of scrap briar and sand each one with a different grit. Mount them on a board (left to right--from lowest grit to highest) and then as you are in your sanding phase, you can compare the size of the scratch marks on each piece of briar to your pipe before moving up to the next highest grit. This is an old trick that beginning, traditional furniture finishers used to use to teach themselves to "see" when it's time to move on to the next grit.
“When one man, for whatever reason, has the opportunity to lead an extraordinary life, he has no right to keep it to himself”
― Jacques-Yves Cousteau
Sorringowl's leather pipe accessories shop: http://www.sorringowlandsons.etsy.com
― Jacques-Yves Cousteau
Sorringowl's leather pipe accessories shop: http://www.sorringowlandsons.etsy.com
Re: author
There's really no need to go above about 600 grit with pipes. After that you're going backwards on the buffing wheel. The secret is to sand the entire pipe through each grit until all scratches fro the previous grit are gone.
The tip with the alcohol is a good one. It'll make scracthes show up if you can't see them. Some makers also stain a pipe between each grit. When the stain is all gone, so are the scratches.
Rad
The tip with the alcohol is a good one. It'll make scracthes show up if you can't see them. Some makers also stain a pipe between each grit. When the stain is all gone, so are the scratches.
Rad
Re: author
Thanks for the tips. This is going to help a lot. I'd never even heard of pumice, nor tried wet sanding.
I also scored a stronger pair of reading glasses so I can see the scratches better before seeing them in the photograph.
Re: author
A classic Author. I think you should improve the fit of the mouthpiece with the reed pipe.
Greetings.
Felix
Greetings.
Felix
El mundo de la pipa
http://pipasmasso.blogspot.com.es/