Want to show you work to the world? Want a place to post photos of your work and solicit the opinions of those that have gone before you? Post your work here.
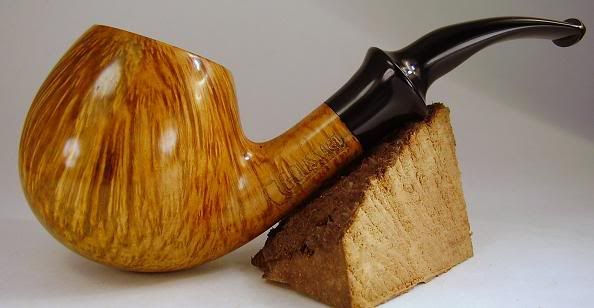
I think it's the best pipe you've made yet. Looks like there's a bit of a bulge about 10cm above the flared ring on the stem (that could be fixed), but aside from that I like everything about this pipe.
"Cut your own wood and you warm yourself twice." - Henry Ford
The only things I detect are that from the front, the bottom right of the bowl looks a bit heavier than the bottom left. Could just be a trick of the grain, but I think it's a bit fatter.
For my own tastes, I would like to see the flare on the stem a little gentler. The transition is from smooth, round stummel, to flat shank/stem, and then the big immediate flare. I like the idea, but a smoother, subtle curve would appeal to me more.
Well done Charl. This one's looking really good. I have to agree with Fred about the little bulge on the stem and with Sasquatch about the bowl. But I also must admit that I did not notice the bowl thing before I read his post. Had to go back and look . Could be the grain or the lighting. Or could it be that the stem is not fitted perfectly straight for the pic ? It might also cause a slight optical illusion.
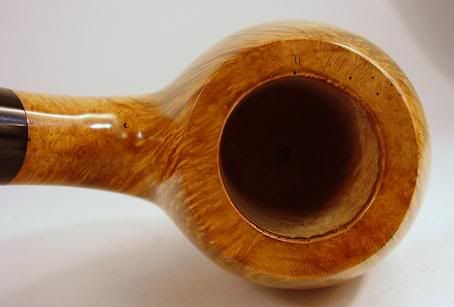
What are those little marks on the rim? 60# scratches ?
Definitely your best yet - excellent progress. I think the problem with the front view is that the pipe is canted slightly to the left in the photo - possibly just a photographic thing.
Last edited by Frank on Wed Jun 10, 2009 12:54 pm, edited 1 time in total.
Regards,
Frank.
------------------
Grouch Happens!
People usually get the gods they deserve - Terry Pratchett
This is something I have been wondering and your pipe gives me a chance to ask. I like bent pipes and that is what I generally make. I always have issues, like this pipe here, of the shank blending into the body of the pipe. Should there be more defenition between the two or is this good for a pipe bent this much?
Great pipe btw. Very nicely done.
The opinions expressed above do not necessarily reflect those of the management or of the little green men who have been following me all day.
Overall I think this pipe shows a marked progression of your work to date. The staining is very nice, and the finish is overall very, very good.
A few things I notice are:
- The stem has a cylindrical section after the flare before it begins to taper towards the button. While this can look okay while you're shaping it, once the stem is bent, this straight cylindrical section will look like a bulge in the stem. On the next pipe with a stem like this, try taking the taper straight from the flare all the way to the button - that will have a dual effect of making it appear more graceful, and at the same time make the stem much more comfortable.
- Also on the stem, I think that I would try to get the turned cylindrical section behind the flare (button side, not shank side) to a smaller diameter. I think this will help transition a little - as well as make shaping a taper from flare to button a little less work. This isn't strictly necessary, but it will help lighten the look of the stem considerably.
- on the shank side of the flare, I think I would personally like to see the cylinder shorter. It will help lighten the pipe overall by quite a bit. This is my opinion though, and I expect that about half the customer base would disagree with me.
- It's difficult on steeply bent pipes like this, but cutting away the "meat" at the shank/bowl transition area is a necessary time sink. If you can't get in there with the grinder or sander, resort to round files, or even triangular files if needed. The difference in look of the final product is worth every moment spent. You can really see this effect in the top and bottom views where the shank flares rather obviously as it nears the bowl. I don't recall what tools you use to shape, but one trick that may prove useful is a small metal ruler or straightedge - use it to identify high and low spots on a shank, and to see if it flares a lot when approaching the bowl. Obviously, on curved shanks, this won't work on the top and bottom, and you need to eyeball those, but it can still give you a good indication of the sides. My favorite tool for getting the meat out of steeply bent pipes is a structured carbide bit in my dremel's flex shaft handpiece. It makes very quick work of the wood, and I allows for loads and loads of control.
- Speaking of curved shanks, I think this pipe is a prime candidate for one. My personal preference would have been to give the shank a lower lower angle fo intersection, and make up the difference with a shank that curves upward. This sounds scary, but it's really not - just keep the holes and passages lined up and inside the wood, and you'll be fine. Again, this has the benefit of really imparting a sense of grace and flow, and is worth every moment you spend trying to figure it out.
- It looks like you were able to move the lowest point on the pipe slightly to the rear of the bottom of the tobacco chamber. This is a great trick, and helps impart flow and movement in the pipe. When combined with a curved shank, this can be used to incredibly great effect to take a pipe from looking really good, to having people fight over it at a show. You do need to be careful with it though, because a pipe that's too steeply bent, while still keeping this trick of center of gravity, can sometimes end up backfiring. That's not necessarily the case here, but just something to keep in mind when using this design feature.
- The staining is great. It looks like you really spent time on it, and in particular, the birdseye on the bottom is excellent. Getting the depth of color in the birdseye as you did can prove daunting to some folks.
- The finish also looks great. There seem to be some scratches on the rim, but I can't tell if those are actually scratches, or if they're artifacting from JPEG compression of the image. Either way, the rest of the pipe is finished very well with a nice, uniform shine. The stem also is nice and shiny, without any indication of missed stems.
Overall, I like this pipe quite a bit. On a very personal note, if it had a slightly thicker shank (and I had any disposable cash), I would linger over it at your table at a show. If you do make another like this, try incorporating some of what I mentioned above, and you'll take the pipe right into the next level.
Thank you very much for all your replies, guys. I really appreciate it.
Had another look at the pipe, and decided that I really have a lot of hard ahead to get my stems right. There definitely is that bulge, for starters.
On the stummel the right is still a wee bit too heavy, like you said, Sasquatch. It doesn't matter how many times during shaping I have a look at symmetry, there will always be something not totally right!
Those little marks on the rim is not scratches. I noticed them at 220 grit, tried to get them out, but failed. I suppose it's little cracks in the wood?!
A curved shank would have been great, I think. But at the moment I don't really have the tools to do it. Need to sell some pipes for more tools!
And thanks for the detailed comments, Kurt.
Charl wrote:
A curved shank would have been great, I think. But at the moment I don't really have the tools to do it. Need to sell some pipes for more tools!
You may be surprised. There's nothing actually needed for a curved shank that you don't already have. If you can make a straight shank, you can make a curved one. On most curved shanks, the airway is still straight as an arrow - it just deviates from the axis of the mortis in order to stay inside the wood. At that point, it's just a matter of shaping the exterior of the shank into a pleasing curve.
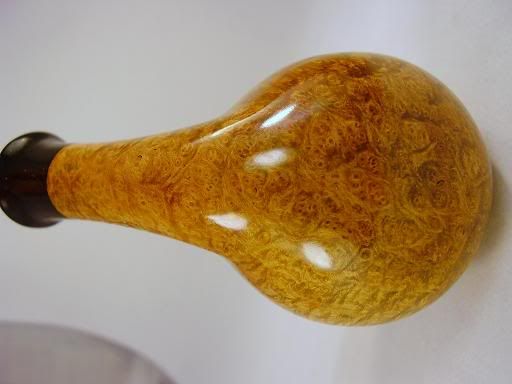
Here's a picture of two somewhat similarly shaped pipes, but one has a much more fluid curve to the shank (both are drilled almost identically). The top pipe, an old Imperatori-era Il Ceppo, has long been one of my favorites. An outstanding shape w/ great blast.
The Il Ceppo is beautiful.
On the curved shank thing: The drilling is easy, no problem there. It is the shaping of the shank that is bit daunting. The side to side profile is like normal, but to get an even curve at the top and bottom, that will take a bit of practice! Maybe a French wheel with the right type of curve will do wonders?
I suspect that the thing will take care of itself if you chuck the stummel in such a way that the shank "misses" the bowl. Then turn that part round as a guideline, and a bit of file-work on the underside to curve to the bowl, and presto.
Gosh, it sounds easy!!!
That Il Ceppo teaches many lessons. 1. A thicker mouthpiece can be comfortable under the right circumstances. 2. Most pipes called "ring grain blasts" are nothing of the sort. 3. You can make small pipes with HUGE bowls. Somehow.