
My pictures suck !
I think I have a good camera, but I obviously dont know how to use it. I think the problem is my lens and the fact that I set the camera to pick its own settings (don't know the first thing about settings on this thing).
The camera I have is a Canon EOS Digital Rebel XT. The lens I have, I was told is for a 35mm camera not a digital. Its marked Canon Zoom Lens EF 35-80mm 1:4-5.6 III 25mm 0.4m/1.3 ft. That might as well be written in the Germanic Runes for all it means to me.
I have 4 big Flourescent photography lights on Ubrellas/Stands that I use for lighting. I also have a photography tent that I don't use much.
I know a few of you guys are well versed with this stuff, any help with settings on my camera, finding a better lens or tips on the rest of the setup would be much appreciated.
Photography Help
Photography Help
Ryan Alden
http://www.aldenpipes.com
http://www.aldenpipes.com

Re: Photography Help
Ryan,
You're doing it all wrong.
Hope this helps.
Rad
You're doing it all wrong.
Hope this helps.
Rad
-
LatakiaLover
- Posts: 3120
- Joined: Sun Sep 02, 2007 4:29 am
- Location: Kansas City, USA
- Contact:
Re: Photography Help
Ryan,
Rad is right.
Hope this helps.
George
Rad is right.
Hope this helps.
George
UFOs must be real. There's no other explanation for cats.


Re: Photography Help
I'm not sure I can tell you what to do better, but I can say that I get decent pics with my point and shoot Canon Powershot Elph. I too set it to "dummy" mode and let it pick what's best. I use a light tent and make sure I have plenty of ambient light. I don't let the camera use the flash. That seems to work fairly well for me. As Wally pointed out (I think it was him) it's best to set it a bit away and use a bit of zoom to bring it into frame as you want.
But I am most likely all wrong. I too wish I could take better pics, like Daniel of ND Pipes or The Smoking Yeti. They've got it down.
But I am most likely all wrong. I too wish I could take better pics, like Daniel of ND Pipes or The Smoking Yeti. They've got it down.
-
Literaryworkshop

- Posts: 275
- Joined: Thu Feb 28, 2013 3:57 pm
- Location: Alabama Gulf Coast
- Contact:
Re: Photography Help
I'm no expert, not by a long shot, but I can tell you what has helped me improve my photos.
1. Steady hands or a tripod. There's nothing like camera shake to ruin a good shot, so if you can't keeps your hands really steady, use a tripod. You can get a good one cheap second-hand.
2. Your camera is fine. I use a point-and-shoot digital camera, which is definitely a step down from yours. Photography is probably 75% technique and 25% equipment.
3. Control your light sources, and don't use a flash. Instead, set up a "light box." It's very simple. Get a cardboard box and cut off two adjacent sides. Drape some fabric inside it. Then use some sort of point-able light source (I use a cheap Luxo knock-off) to shine from above. Shooting with filtered natural light also works. An overcast day is perfect, but non-dappled shade also works really well.
4. Shoot from further back, and then crop. That makes for a more natural perspective.
5. Use your photo-editing software to tinker with the photos. A too-dark photo can be easily brightened up. Color can be adjusted to fix wash-out. It's kind of fun after a while.
- Steve S.
-
The Smoking Yeti
- Posts: 1346
- Joined: Tue Jan 10, 2012 4:55 pm
- Contact:
Re: Photography Help
Yeah, take a photo of your setup. If you want to be serious about your photos, don't shoot on dummy mode.
Here's how it works, if you're shooting on a white background, you have to manually over-expose your photo by about 1- 1.5 stops(a stop is the bar that shows how bright the image is, the center is usually where you want it under norma lighting, but the bright white of the background means you want to over-expose, trust me)
Secondly, they're right, zooming in is GOOD. It sounds like your lens is fine, shoot all the way zoomed in, it'll create a more natural looking image. I shoot most of my images at a focal length of 100mm. I believe your camera has a frame ratio of 1.6x- basically that means when you shoot at a 35mm zoom, you're ACTUALLY shooting at a true 50mm focal length, which is what the human eye sees at. So, for natural looking photos you need to shoot at 35mm or longer, otherwise the depth of field illusion will make your pipes appear long and stretched out(which helps when photographing some pipes, but not the smoking kind).
As far as lights go, the type of light bulb really matter; I have begun lighting with simple 6500k(look for this on the package) Florescent bulbs, and they give wonderful white light, which gives a truer representation of the pipe's actually color in daylight than most other bulbs I've used.
The others have hit on the importance of some sort of light box. Frankly, tissue paper covered frames can do the trick, but a good light box is pretty darn cheap, and it makes the job really easy.
Here's a great affordable box- http://www.amazon.com/CowboyStudio-24in ... hotography
Now, a tripod is also important. Something worth noting- even on a tripod it's easy to get blurry images. To avoid this, set the camera to a 2 or 10 second shutter delay timer(the kind we usually use when taking a family photo), and press the shutter, and remove your hand. This gives the camera to settle back into place after the pressure of your hands, vwala! Clearer pictures.
The optimum F-stop(aperture) to shoot at, varies depending on your camera. A good rule of thumb is somewhere between eight and sixteen, again, it all depends on the quality of your lens. Usually I shoot somewhere around 14, and get great depth of field clarity, and better images.
I hope these tips help.
If you want to get fancy with the spices, check out Niell's tutorial at apassionforpipes.com
Link: http://www.apassionforpipes.com/neills- ... orial.html
Cheers!
Yeti
Re: Photography Help
Hey Ryan,
I Use a Rebel EOS T1i, and it has a setting up top called Av. You can view your pipe through the screen using this. You can also stop it down to F22 so everything is in focus, not just the part you've focused on. Use a tripod, light tent and shoot with a 2 second delay, and you'll get sharp pics that can be made even sharper in your photo editing program.
Hope this helps. Seriously.
Rad
Re: Photography Help
Ok Thanks for the tips. There are several things mentioned that I don't do, so hopefully the changes will give some better results.
Ryan Alden
http://www.aldenpipes.com
http://www.aldenpipes.com
Re: Photography Help
The farther you are from the pipe, the better. I do not have a light box yet, but I plan on making one in the near future. The reason that it is better to be farther back is because it increases you "Field of View" (FOV). This means that more linear area is able to be in focus at one time. So, back that camera up until you can have the entire pipe in a crisp, defined FOV. But you don't want to go too far back. Basically go as far back as possible while still keeping only the pipe and white background in your picture, this will be accomplished by using that adjustable lens to zoom in as far as you can.
With Telephoto lenses, photographers do what is called "stacking." It causes several subjects that are at different levels of distance from the camera to look like they are right next to one another. For example:
OR

When really the posts are this far apart.
This is accomplished by maximizing the FOV, which causes more of the landscape to be in focus. Same idea with pipes. You want the entire piece in focus for the scrutiny of the higher-ups... (Ocelot 55, Rev, or Scottie) but definitely, and I mean DEFINITELY, never listen to a thing Rad has to say. I think he has a Chinese guy do his pipes and photography...
If you must use flash, direct it into a sheet above, or off a wall. This is called "bouncing". This way hard shadows are avoided, and glares are avoided as well.
Take only profile shots of your pipe, use a small stand to prop it up. Front, Back, Left Side, Right Side, Top, Bottom, Button, Shank/Bowl Junction. And make sure to sand that chamber first.
Always use a tripod if possible. Delay the shutter from opening for two or three seconds after pushing the shutter button. This minimizes blurry pictures due to shaking of the camera.
Are there any other questions or things you can't figure out?
Jonathan
With Telephoto lenses, photographers do what is called "stacking." It causes several subjects that are at different levels of distance from the camera to look like they are right next to one another. For example:
OR
When really the posts are this far apart.
This is accomplished by maximizing the FOV, which causes more of the landscape to be in focus. Same idea with pipes. You want the entire piece in focus for the scrutiny of the higher-ups... (Ocelot 55, Rev, or Scottie) but definitely, and I mean DEFINITELY, never listen to a thing Rad has to say. I think he has a Chinese guy do his pipes and photography...
If you must use flash, direct it into a sheet above, or off a wall. This is called "bouncing". This way hard shadows are avoided, and glares are avoided as well.
Take only profile shots of your pipe, use a small stand to prop it up. Front, Back, Left Side, Right Side, Top, Bottom, Button, Shank/Bowl Junction. And make sure to sand that chamber first.
Always use a tripod if possible. Delay the shutter from opening for two or three seconds after pushing the shutter button. This minimizes blurry pictures due to shaking of the camera.
Are there any other questions or things you can't figure out?
Jonathan
-
The Smoking Yeti
- Posts: 1346
- Joined: Tue Jan 10, 2012 4:55 pm
- Contact:
Re: Photography Help
For all this knowledge your pictures still suck.RadDavis wrote:Hey Ryan,
I Use a Rebel EOS T1i, and it has a setting up top called Av. You can view your pipe through the screen using this. You can also stop it down to F22 so everything is in focus, not just the part you've focused on. Use a tripod, light tent and shoot with a 2 second delay, and you'll get sharp pics that can be made even sharper in your photo editing program.
Hope this helps. Seriously.
Rad
Hope this helps.
Yeti
Re: Photography Help
Alden,
In order to really help we need to know how your pictures suck, ie, lighting, focus, getting close up/detail in shots, whatever.
The XT is a very good camera. It will let you make adjustments for the type of light you're working with (or against), depth of field, focal length, etc. The automatic setting should generally work well in a lighted environment. However, when you mention florescent lighting, I'd suggest you set your white balance for that type of light.
The auto focus feature with these lenses is sometimes problematic and you may try to manually focusing to get a good image. Also, this particular lens is not particularly great for macro shots.
Without knowing the specifics of "suck", it's kind of hard to give useful advice. Those F stops, shutter speeds and ISOs are not terribly difficult to understand, but it takes practice and changes in different situations.
If you can provide the specifics or even photos it might be possible to help. Feel free to pm me if I can help.
Re: Photography Help
Probably my biggest problem is, I don't want to learn something else that I know entirely nothing about.... After learning to level lathes, run lathes, wire motors, wire outlets, turn wood, shape wood, finish wood, build a workshop, build a website and all the other things I had to learn from the ground up..... I was sort of hoping someone would say "push the button on the bottom of your camera, and your pictures will suddenly be awesome"....
I guess I need to quit putting it off, and just learn how to use my damn camera !
Ron, what sucks most in my pics is that I lose detail... edges of pipes are fuzzy, nothing is as crisp as I would like. Color is Ok. Lighting is pretty bad.
I think moving my camera back will help a ton. As it is, I am shooting maybe 15" away from the pipe.
Could you recommend a Lens that would be better suited ?
Ryan Alden
http://www.aldenpipes.com
http://www.aldenpipes.com
Re: Photography Help
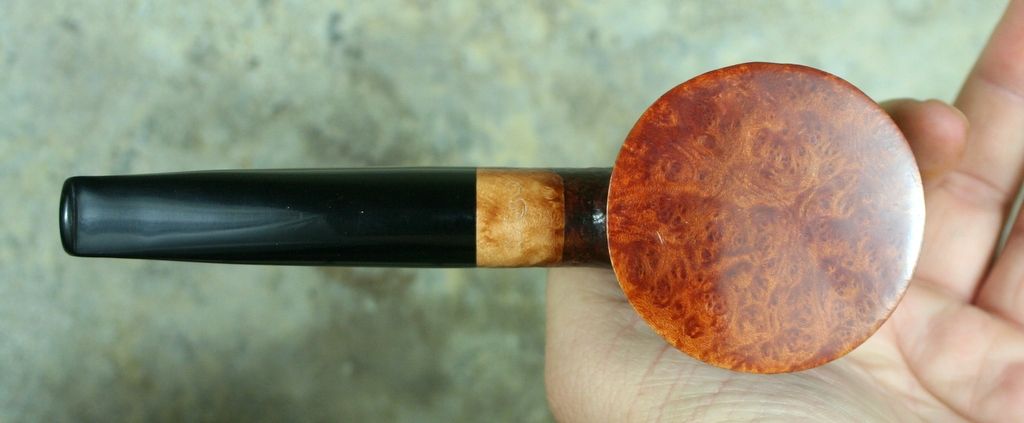
Heres an example of lost details. Overall the pipe seems to be crisp, but the stamping (which is easily visible in person) is almost entirely lost in the shot. So the picture looks ok, but the small details are lost, and it sucks in comparison to holding the pipe in hand. I don't want to make a pipe look better in pics than it does in real life, but the opposite is just as bad. "These pics suck, in person its really awesome though".
The color is about right.
The lighting looks good, but only because I edited in Picasa to make it bright.
I hate editing every single picture to make it half decent.
The color is about right.
The lighting looks good, but only because I edited in Picasa to make it bright.
I hate editing every single picture to make it half decent.

Ryan Alden
http://www.aldenpipes.com
http://www.aldenpipes.com
Re: Photography Help
I'm pretty sure you have to do this. I know I do.I hate editing every single picture to make it half decent.
Get a photo editing program like Photoshop or Paint Shop Pro. They have a "sharpen" feature that's pretty awesome.
Rad
Re: Photography Help
I edit every photo I take too. You only need 10 seconds per pic though. If you don't want to spend money on it, Picasa (from Google) is fine. I don't believe you can cut out your background, but you can sharpen the details quite a bit. Photoshop Elements is good too; I think it's about $80 now. I don't think you really need to buy the full version of Photoshop.RadDavis wrote:I'm pretty sure you have to do this. I know I do.I hate editing every single picture to make it half decent.
Get a photo editing program like Photoshop or Paint Shop Pro. They have a "sharpen" feature that's pretty awesome.
Rad
Re: Photography Help
Try The GIMP and UFRaw for raw file editing...the are both freeware and you can get the windows build if you're rerunning MS
James
James
Re: Photography Help
Alden,
That's not a bad pic at all. The stamp is visable (looks like a "5") and the grain comes through.
The only issue is the direct lighting which is causing some glare on this pic. Difuse the lighting so that the glare is eliminated or tuned down.
One fix in Picassa is on this pic is to go to the Sharpen control; put that sucker on max. You will see an enhancement in both grain and the stamp. Try it; sure worked at my end when I played with it.
Re: Photography Help
Thats the problem.... The stamp actually says " R.E. Alden, the greatest pipemaker since that Bo guy, this is the finest pipe in the whole wide world, Made in USA"ronps wrote: The stamp is visable (looks like a "5")
I'm not saying the pictures are terrible, but they aren't as good as I want them to be (just like my pipes)
I will take a lot of the advice from this thread and try again later this week.
Ryan Alden
http://www.aldenpipes.com
http://www.aldenpipes.com