Page 1 of 1
need some help with this nail tool!!
Posted: Fri Jul 27, 2012 7:49 pm
by timothy thorpe
so i finally made the nail tool, my question is that the compression tip moves around. how would this work??
Re: need some help with this nail tool!!
Posted: Fri Jul 27, 2012 11:49 pm
by Tyler
I'm at a loss...it's screwed on tightly, right?
Re: need some help with this nail tool!!
Posted: Sat Jul 28, 2012 1:34 am
by Ocelot55
timothy thorpe wrote:so i finally made the nail tool, my question is that the compression tip moves around. how would this work??
I've had the same problem with mine. I think larger nails might be a solution.
Re: need some help with this nail tool!!
Posted: Sat Jul 28, 2012 6:25 am
by timothy thorpe
hi Tyler, yes, rad has helped me. nails into an oak dowl with epoxy. im just looking to add another tool to the shop that all

Re: need some help with this nail tool!!
Posted: Sat Jul 28, 2012 10:02 pm
by Growley
Ocelot55 wrote:timothy thorpe wrote:so i finally made the nail tool, my question is that the compression tip moves around. how would this work??
I've had the same problem with mine. I think larger nails might be a solution.
Same problem here too. I gave up trying to use it. I just don't get how the insert deal is supposed to tighten down on the nails. Maybe I got the wrong insert or something...
I've always heard "you have to be smarter than what you're working with." That's probably my problem

If anyone wanted to post a Home Depot or Lowes link to the part that screws in to the pipe, I'd be grateful.
Re: need some help with this nail tool!!
Posted: Sat Jul 28, 2012 10:16 pm
by RadDavis
Take 5 dry wall screws and grind off the heads. Drill a hole in an oak dowel that will accommodate(snugly) the 5 screws, pointy end out. Drill the hole so that about 1/2 inch of screw stick out the dowel. Put the screws in the hole in the dowel(pointy end out). Fill the hole with epoxy. Cut the dowel the length that feels comfortable in your hand. This is your handle. Round off the end opposite the screws, so it doesn't dig into your palm when you're using it.
When the epoxy cures, you're all done.
Rad
Re: need some help with this nail tool!!
Posted: Sat Jul 28, 2012 10:26 pm
by e Markle
RadDavis wrote:Take 5 dry wall screws and grind off the heads. Drill a hole in an oak dowel that will accommodate(snugly) the 5 screws, pointy end out. Drill the hole so that about 1/2 inch of screw stick out the dowel. Put the screws in the hole in the dowel(pointy end out). Fill the hole with epoxy. Cut the dowel the length that feels comfortable in your hand. This is your handle. Round off the end opposite the screws, so it doesn't dig into your palm when you're using it.
When the epoxy cures, you're all done.
Rad
What on earth for? Did I stumble upon the "Home Defense" section of the forum???
Re: need some help with this nail tool!!
Posted: Sat Jul 28, 2012 10:55 pm
by andrew
Tomorrow will expound on the proper deployment of the "nail tool".
Re: need some help with this nail tool!!
Posted: Mon Jul 30, 2012 11:27 am
by jogilli
Here are the pictures from what I tried to explain.. it's not rocket science, and rather simple application of a left over spade bit shank
You just take your time and twist your heart away... I also have two versions of Tylers when I want a rougher finish
james


Re: need some help with this nail tool!!
Posted: Mon Jul 30, 2012 8:05 pm
by SchmidtN
Nail tool = nails and compression fitting as far as I know.
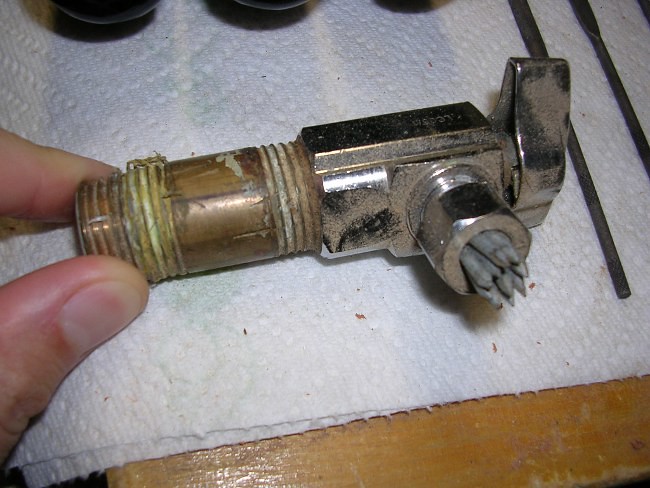
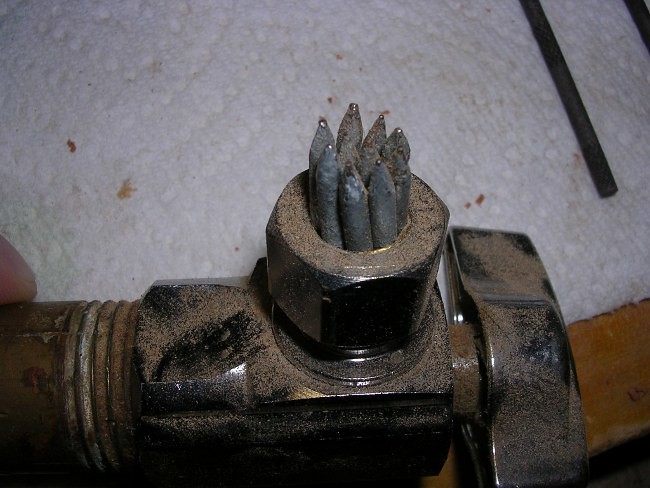
I used diamond point nails that were intended for pressure treated wood. Cut them purdy dang short, crammed (had to hammer in the last one, it was a tight fit) them into a compression fitting and tightened the fitting as much as I could without ripping the skin off my hands. The brass compression ring is just barely visible in the second picture. Just clamp the thing down and go to town with a closed box wrench, but it has to be darn tight before you even start with the compression nut and you can still see mine turned a little bit before the nails locked in place.
Re: need some help with this nail tool!!
Posted: Mon Jul 30, 2012 10:35 pm
by e Markle
How silly... just use your sand blaster!
Re: need some help with this nail tool!!
Posted: Mon Jul 30, 2012 11:06 pm
by SchmidtN
You're lucky I'm not using my fork.
Re: need some help with this nail tool!!
Posted: Tue Jul 31, 2012 1:21 am
by andrew
SchmidtN wrote:Nail tool = nails and compression fitting as far as I know.
I used diamond point nails that were intended for pressure treated wood. Cut them purdy dang short, crammed (had to hammer in the last one, it was a tight fit) them into a compression fitting and tightened the fitting as much as I could without ripping the skin off my hands. The brass compression ring is just barely visible in the second picture. Just clamp the thing down and go to town with a closed box wrench, but it has to be darn tight before you even start with the compression nut and you can still see mine turned a little bit before the nails locked in place.
I think you might want to check your sink. It is probably leaking... or flooding.
Re: need some help with this nail tool!!
Posted: Tue Jul 31, 2012 3:26 pm
by SchmidtN
Look, would you rather have hot water from the bathroom sink, or a pipe with no visible pits on it? It's one or the other.
Re: need some help with this nail tool!!
Posted: Mon Aug 06, 2012 3:39 am
by Mark Beattie
RadDavis wrote:Take 5 dry wall screws and grind off the heads. Drill a hole in an oak dowel that will accommodate(snugly) the 5 screws, pointy end out. Drill the hole so that about 1/2 inch of screw stick out the dowel. Put the screws in the hole in the dowel(pointy end out). Fill the hole with epoxy. Cut the dowel the length that feels comfortable in your hand. This is your handle. Round off the end opposite the screws, so it doesn't dig into your palm when you're using it.
When the epoxy cures, you're all done.
Rad
+1. Thanks Rad.