A Helpful Hint

Want to show you work to the world? Want a place to post photos of your work and solicit the opinions of those that have gone before you? Post your work here.
Post Reply
User avatar
ToddJohnson
Posts: 1366
Joined: Thu Nov 23, 2006 8:00 pm
Location: Nashville, TN
Contact:

A Helpful Hint

Post by ToddJohnson »

I wasn't sure where to post this, but I figured everybody would read it here. Kurt, if you want to move it somewhere else, please feel free.

I've noticed a lot of guys trying pieces with curved tapered shanks and radiused shank rings lately. This is a fairly difficult shape to execute, and I thought I would share a little trick for creating them.

The most glaring problem I see with many of these is that the end of the shank has been slightly rounded over during sanding. Then when the shank ring goes on, there is a little V-shaped groove all the way around the circumference of the shank.

The way you avoid this is with a disposable (or recyclable) shank cap. Once the pipe is rough shaped, you've squared the shank and cut the small tenon for the ring to fit over, you need to create this "cap." Put it on the pipe and leave it there through the entire process. You can remove it after final shaping to cut and fit the ring, but you want to put it back on for the entire finishing process. Then, once you remove the perfectly finished and waxed pipe from the clean buffing wheel, take the cap off and epoxy the ring into place. You will have perfect 90 degree edges and a perfect fit of the ring.

Here are some example photos below:


Image
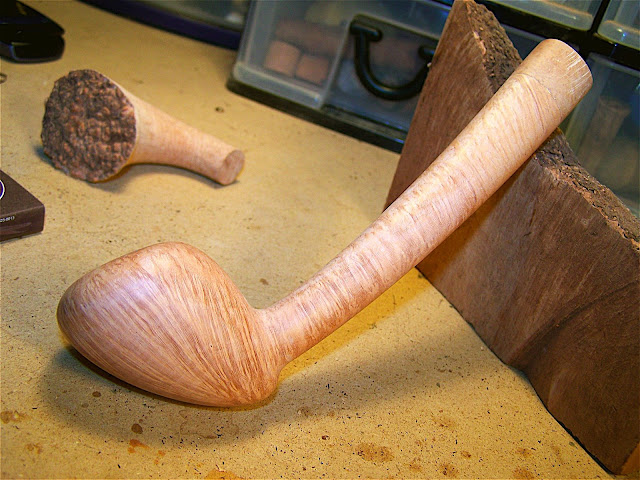
Note the cap on the last 3/4" of the shank.


Image
More visible in this shot.


Image
Here's a shot alongside a finished piece with a radiused ring.


Image
And yes, I make one for every pipe I produce with a radiused ring--perhaps 30 or so per year.

If you want a good argument for making all of your mortise/tenon joints in one of two sizes, this is it. A large cap will be used a couple of times before ending up too small to be useful. This is something Lars taught me and the difference in perfection of finish is significant. The importance of focusing on the finer details cannot be overstated.

Todd
User avatar
pipeyeti
Posts: 72
Joined: Thu Nov 23, 2006 8:00 pm

Post by pipeyeti »

Todd nice tip. Alex Florov has been doing many of these lately and he uses the same trick to keep a nice hard edge, he puts the decoration on at the end. I am very fortunate to get to spend a few hours every couple of weeks in his shop. Its always hard for me to get any work done while I am there. Its too interesting just watching him work and picking up little things like that, to him its just the way things are done. I have picked up more tips and tricks by just watching him and figuring out, or asking him why he is doing things the way he is. I am lucky to have him as a friend. For the guys who don't have access to an accomplished carver to watch, tips like this from you are very helpful. Please post more when your schedule allows. Maybe there could be a section on the board just tittled tips and tricks. I also participate on a pen makers board that has a section like that and its always interesting. Kurt is on that site also.
wdteipen
Posts: 2819
Joined: Sat Mar 29, 2008 1:05 pm

Post by wdteipen »

Great tip, Todd. Btw, that long acorn is a fantastic pipe!
Wayne Teipen
Teipen Handmade Briar Pipes
http://www.teipenpipes.com
User avatar
KurtHuhn
Site Admin
Posts: 5326
Joined: Thu Nov 23, 2006 8:00 pm
Location: United States/Rhode Island

Post by KurtHuhn »

Todd, have you found that using at least 3/4" stock helps to keep the end going in the direction you want it? I tried using some 1/4" stock about a year ago, and was not pleased. Ended up redoing the shank with 3/4" maple stock.
Kurt Huhn
AKA: Oversized Ostrogoth
artisan@k-huhn.com
User avatar
ToddJohnson
Posts: 1366
Joined: Thu Nov 23, 2006 8:00 pm
Location: Nashville, TN
Contact:

Post by ToddJohnson »

KurtHuhn wrote:Todd, have you found that using at least 3/4" stock helps to keep the end going in the direction you want it? I tried using some 1/4" stock about a year ago, and was not pleased. Ended up redoing the shank with 3/4" maple stock.
Yeah, I don't really measure it--it's based on what small chunks of briar I have lying around (which are few since I typically grind everything that is not a pipe into dust)--but you do need enough of an extension that you can carry the lines of the shank on through. Otherwise it is somewhat self defeating. Also, I would suggest using only briar. You want something with identical density, porosity, etc. Again, one of the keys to this whole endeavor is minimizing the variables.

Todd
User avatar
sethile
Posts: 770
Joined: Thu Nov 23, 2006 8:00 pm
Location: Murray, KY
Contact:

Post by sethile »

Wow, that's a fantastic tip, Todd, thanks!
Scott E. Thile
Collector, smoker, and aspiring pipemaker.
http://sethilepipes.com
Sysop: http://pipedia.org
---------------------
Post Reply