jet black wood

KurtHuhn wrote:That must be the missing bit. I've been using vinegar that's also used to etch knife blades - iron is definitely the missing ingredient.
Yeah, I basically got squat untill I added the iron oxide. Once that came into the mix you don't even have to wait overnight. I tried a piece that I just coated with the tannic acid and let dry for 15 minutes then used a brush with the vinegar rust mixture and it turned jet black before my eyes in a mere 20 seconds. I am glad you stumbled on this Kurt. The thought of messing around with chemicals that if you got a quanity on your skin or breathed the vapors would disable your blood to carry oxygen made me nervous to say the least.
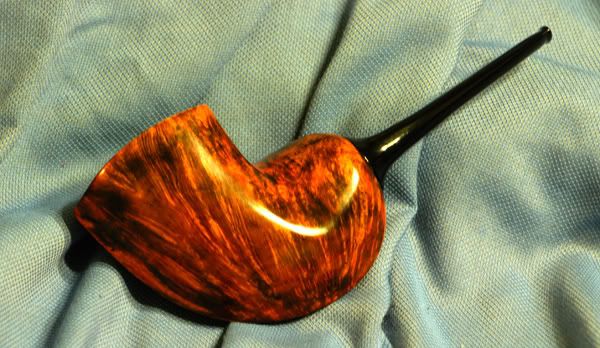
Here are a couple of examples achieved using a similar technique, with one major difference and one minor difference, with a total time to finish of about 45 minutes to 1 hour:

The gold contrast above was a 3 step process using a base coat, reactant coat, and a stain coat to neutralize "greening" when the yellow final color was added. Below is a simpler, two step application:

I'll leave it to the chem lab experts to figure out which ingredients were different. It's all simple stuff, though, no toxic materials or special handling required. I plan on doing a LOT of variations of this green finish in the near future.
The gold contrast above was a 3 step process using a base coat, reactant coat, and a stain coat to neutralize "greening" when the yellow final color was added. Below is a simpler, two step application:
I'll leave it to the chem lab experts to figure out which ingredients were different.
Happy Smoking,
Trever Talbert
www.talbertpipes.com
My Pipe Blog:
https://talbertpipes.com/category/pipeblog/
My Lizards & Pipes Web Comic:
https://talbertpipes.com/category/lizards/
Trever Talbert
www.talbertpipes.com
My Pipe Blog:
https://talbertpipes.com/category/pipeblog/
My Lizards & Pipes Web Comic:
https://talbertpipes.com/category/lizards/

Yeah, I'm pretty fond of the green coloring too, and am eager to try it out on some new Goblins. I've got two versions, the "zap" version and the earth-toned version - the one in the pic was the "zap" version, done with a bright, largely transparent pure green to create more *pop* in the contrast and make it stand out at a distance viewing, like the gold/black. The earth-toned version actually looks better, IMO, but isn't so contrasted or snazzy. It just has strong grain contrast with shadows fading from deep green/brown to light forest green. Speaking commercially, it looks more "expensive" than the bright green, FWIW. I'll be curious to see how pipes in each finish are received.KurtHuhn wrote:Is it just me, or can anyone else see evil eyes and hooded figures in the green one? This looks like a finish for the Goblins to me.
Nice work Trever! To say that I like the green one is a gross understatement.
Happy Smoking,
Trever Talbert
www.talbertpipes.com
My Pipe Blog:
https://talbertpipes.com/category/pipeblog/
My Lizards & Pipes Web Comic:
https://talbertpipes.com/category/lizards/
Trever Talbert
www.talbertpipes.com
My Pipe Blog:
https://talbertpipes.com/category/pipeblog/
My Lizards & Pipes Web Comic:
https://talbertpipes.com/category/lizards/
-
Pharaohfitz

- Posts: 13
- Joined: Sat Dec 23, 2006 11:33 pm
- Location: Pittsburgh, PA
Metal mordant to fix tannin dye
I noticed several folks mentioning bolts, nails, etc. . Dyes will need to be "fixed" by the vinegar mentioned (acid) and a mordant for the proper chemical reaction. Iron mordant will probably produce deeper browns or dark grays. Some may want to experiment with copper which may lend a greenish tone Trevor.
-
KurtHuhn

- Site Admin
- Posts: 5326
- Joined: Thu Nov 23, 2006 8:00 pm
- Location: United States/Rhode Island
At the risk of boring you all to death, here's the latest results from my experimentation on this.


These are all from the same slab of briar that I cut into smaller sections to give me more sample pieces to work with. The difference in color is due to a light topstain once the contrast had been set. I used a procedure significantly different from my previous experiments, and used a couple different ingredients as well. And, just to keep things honest, it's also based off of, but dissimilar to, Trever's posting on the previous page. It also took me a grand total of about 45 minutes too, instead of an overnight wait. I'm declaring this one a keeper.
Now, the battle of the crazy contrast can truly begin! It's folded over pipe cleaners at 10 paces! France versus New England, in a battle royale!

I would compete, but I am le tired. I go have wine and cheese picnic instead.  And I do not have soft pink flesh, I am quite scabrous and festering, I'll have you know.
Cool recipe, huh? Here is the same contrast process applied to a sandblast:


The contrast is deep enough to survive careful sandblasting. The grain is amazingly black against the natural briar color. It reminds me somehow of a coral snake. I've been smoking this one hard and it's terrific. Now on to several months of stress-testing a new combo of contrast-stain-finish...
Cool recipe, huh? Here is the same contrast process applied to a sandblast:
The contrast is deep enough to survive careful sandblasting. The grain is amazingly black against the natural briar color. It reminds me somehow of a coral snake. I've been smoking this one hard and it's terrific. Now on to several months of stress-testing a new combo of contrast-stain-finish...
Happy Smoking,
Trever Talbert
www.talbertpipes.com
My Pipe Blog:
https://talbertpipes.com/category/pipeblog/
My Lizards & Pipes Web Comic:
https://talbertpipes.com/category/lizards/
Trever Talbert
www.talbertpipes.com
My Pipe Blog:
https://talbertpipes.com/category/pipeblog/
My Lizards & Pipes Web Comic:
https://talbertpipes.com/category/lizards/
-
smokepiper

- Posts: 247
- Joined: Thu Nov 23, 2006 8:00 pm
- Location: Sweden
- Contact:
-
azpipesmoker
- Posts: 10
- Joined: Fri Sep 05, 2008 2:05 pm
- Contact:
-
KurtHuhn
- Site Admin
- Posts: 5326
- Joined: Thu Nov 23, 2006 8:00 pm
- Location: United States/Rhode Island
Thank you! I just need to find a good pipe to compliment the red - which isn't so easy sometimes. Shades of brown and tan are pretty simple since every pipe seems to look good like that. Other colors really seem to need a good reason to deviate from that norm. I've got a couple blocks in front of me right now. Maybe inspiration will strike.azpipesmoker wrote:Kurt I think you should put that red into use on your pipes! Simply stunning. I might have to break my rule about how much I spend on pipes! Well actually it's my wife's rule...
-
smokepiper
- Posts: 247
- Joined: Thu Nov 23, 2006 8:00 pm
- Location: Sweden
- Contact:
Very interresting stain, beautiful !!!KurtHuhn wrote:At the risk of boring you all to death, here's the latest results from my experimentation on this.
These are all from the same slab of briar that I cut into smaller sections to give me more sample pieces to work with. The difference in color is due to a light topstain once the contrast had been set. I used a procedure significantly different from my previous experiments, and used a couple different ingredients as well. And, just to keep things honest, it's also based off of, but dissimilar to, Trever's posting on the previous page. It also took me a grand total of about 45 minutes too, instead of an overnight wait. I'm declaring this one a keeper.
Now, the battle of the crazy contrast can truly begin! It's folded over pipe cleaners at 10 paces! France versus New England, in a battle royale!

I just finished my first try at the tanin finish. A couple of observations.
I applied the tanin to the pipe, let it dry for about 15 mins, then added a second coat and let it dry for about an hour.
Then I applied the iron acetate and the pipe immediately turned black. I let it dry over night. (BTW - I made my iron acetate just a bit different... I put a new piece of steel wool in a jar and then covered it with distilled white vinegar and let 'er brew for a week. It still looks as clear as it did on day one!).
Yesterday, I started sanding and realized what I SHOULD have done before applying the tanin. Next time, I will heat the block up first. The black didn't go quite as deep as I would have liked and sanding it down to the point where I could stain it was pretty easy.
I stained it with Chocolate and although the stain is fairly dark, and the black didn't go that deep or was all that pronounced, you can still see that it has fairly nice contrast.
Test #2 -
I took a Cellini factory reject pipe I picked up off the bay for this test.
I mixed up a bit of tanin / water.
Heated the stummel using a heat gun. Got it fairly hot. Applied a coat of the tanin on the block, then let it sit & dry for a day.
The following day, I heated the block again using the heat gun then applied the iron acetate. The pipe turned completely black instantly. So far so good.
Let it sit for another day to dry, then put it in a plastic bag for a couple more days.
Today, I started sanding it. The black surface sanded off and I was looking at bare wood real quick, without any effort. What little penetrated into the wood is negligible.
I am wondering if Cellini uses some kind of sanding sealer on their stummels. I would have thought that the black would have penetrated deeper into the grain.
Next test, mix the tanin with alcohol.
Kim Kendall
http://www.PenguinBriar.com/
http://www.PenguinBriar.com/
