Page 1 of 2
Shaping a round shank
Posted: Tue Jun 17, 2008 10:49 pm
by wdteipen
Here's a question I've been struggling with: How do you get a round symmetrical shank without the assist of a lathe? I managed to get my last pipe symmetrical but I'm not sure it wasn't more luck than skill. Any suggestions/techniques? I've been contemplating using the PIMO tenon turning tool to get it started. Anyone tried this?
Before I had a lathe
Posted: Tue Jun 17, 2008 11:41 pm
by ckr
I just took a compass and drew the circle. OMG this is so crude. I cut as much off as possible with a coping saw. Then a rough file to a basic round and switched to a finer file. With the files you have to move them. i.e. start at 6 o'clock with your stroke and end at 12 o'clock, then 3 o'clock to 9 o'clock. The whole point was to move around the shank and NOT file in one spot, let the advancing movement take off the highs and form the round. From there I started with 150 grit??, I think, and cut 1/2 to 1 inch strips. Use it like your were born to shine shoes and move around the shank and move through the grits.
It won't be perfect but it will be damn close. Same with the upper bowl.
Once was enough, and I loosened the purse strings and got a lathe and it was a bygone memory till you brought it up.
Posted: Wed Jun 18, 2008 9:21 am
by hazmat
I generally get my stem as close to final outside diameter as possible on my mini-lathe, then put it into the stummel and trace its diameter around the face with a pencil. Then I cut out what I can and start shaping with either files or the disc sander, depending on how much material I have to work with. When I get my shank close to the tranfered mark, I put the stem back in and work at it with files until I have everything evened up. As CKR mentioned, you have to work your way around the shank and not just keep going at it in one place. After you do it a few times, it gets easier and easier to do without worrying, but a lathe would be a nice birthday present... <sigh>....
Posted: Thu Jun 19, 2008 7:50 am
by KurtHuhn
The first few times you try to make a round thing from a rectangular thing, it's going to be a mix if luck and happenstance that it comes out symmetrical.
I've managed to get pretty close to perfectly round without a lathe, but it's time consuming. My method is similar to the one CKR described, but I use a belt grinder to do the scraping. Basically, you have to rotate the shank as it's in contact with the grinding belt, and use a very light hand. Eventually you develop the skill, and it's no big thing to do. That said, I still prefer to turn it on the lathe as much as I can.
Posted: Thu Jun 19, 2008 9:56 am
by hazmat
There's a real simple solution to dealing with perfectly round shanks. Design your pipe to NOT have one. I'm only kind of half jesting. When done well, it saves the lathe-less a bunch of headaches and frustration.
Posted: Mon Nov 17, 2008 11:39 am
by Michl
When using a lathe, I am assuming that you fasten the
shank end into the headstock to turn it, which means that
you need to have enough stock on the shank end to
be held in a chuck or whatever you are using. You
can;t chuck the stummel end because that would be
too difficult to center. Or?
Posted: Mon Nov 17, 2008 3:30 pm
by kkendall
Michl wrote:When using a lathe, I am assuming that you fasten the
shank end into the headstock to turn it, which means that
you need to have enough stock on the shank end to
be held in a chuck or whatever you are using. You
can;t chuck the stummel end because that would be
too difficult to center. Or?
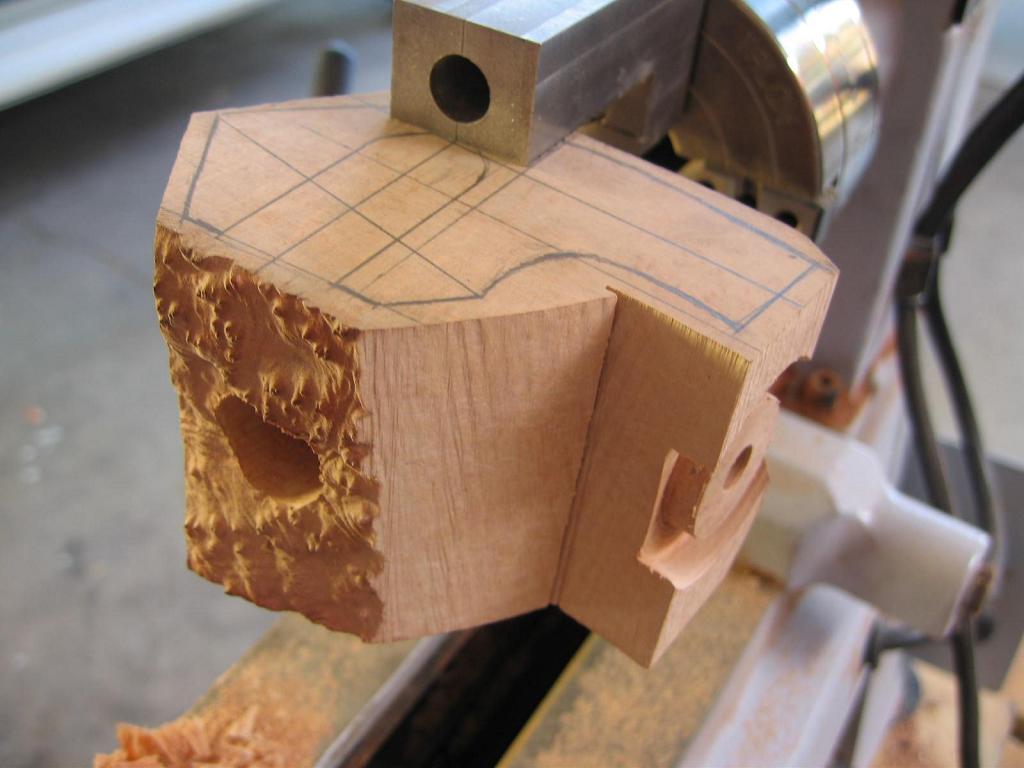
Not exactly. When I drill the pipe using the lathe, I drill the shank end first (drilling the mortise and air hole first before spinning the block around to drill the tobacco chamber).
In this pic below, you can see that the mortise & air hole was drilled and the shank diameter was turned at the same time, so I know that 1) it's round, and 2) it's concentric to the mortise.
If I wanted a longer shank, that's when I would turn it.
Posted: Mon Nov 17, 2008 7:15 pm
by Michl
Ahh, this picture teaches many lessons. Thank you!!
Posted: Sat Nov 22, 2008 7:43 pm
by Michl
I see how to do this when the shank is straight, but
how do you turn a, say, 1/4 bent shank on an
author? the shank has to be centered on the
lathe, but I can't figure out how you'd attach
the briar to the jaw chuck so the shank is
centered facing the tail stock.
M
Posted: Sat Nov 22, 2008 10:59 pm
by Frank
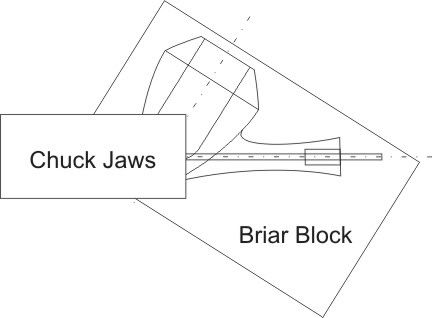
Michl wrote:I see how to do this when the shank is straight, but how do you turn a, say, 1/4 bent shank on an author? the shank has to be centered on the lathe, but I can't figure out how you'd attach the briar to the jaw chuck so the shank is centered facing the tail stock.
M
It doesn't matter how bent the shank is in relation to the bowl, as long as the centre line of your mortise is in the centre from chuck to tailstock. That's one of the reasons why many pipemakers have extended jaws on their lathe chucks.
Maybe this illustration will help clarify:
Posted: Sun Nov 23, 2008 2:47 am
by Michl
Thank you for the drawing!!
Extended jaws... the missing piece for me.
I wonder if I can get some for my chuck.
Posted: Sun Nov 23, 2008 3:11 am
by Frank
Michl wrote:Extended jaws... the missing piece for me. I wonder if I can get some for my chuck.
If you can afford them:
http://www.briarpipetooling.com/tooling/
Posted: Sun Nov 23, 2008 11:04 am
by Michl
Interesting. I guess if you had a welder you could machine and
weld them yourself. Would be extravagant for the occasional
pipe I make, but I wonder if this could somehow be improvised by
wedging the briar between two extended pieces between the jaws.
Posted: Sun Nov 23, 2008 1:58 pm
by Frank
Michl wrote:I guess if you had a welder you could machine and weld them yourself. Would be extravagant for the occasional pipe I make, but I wonder if this could somehow be improvised by wedging the briar between two extended pieces between the jaws.
Some folks have made their own extended jaws as you describe. There might be an outside chance of using wedged pieces with 2 self-centreing jaws, but with independant jaws it would be a right bugger keeping everything in place while trying to centre in 3 planes. You also run the risk of the whole kit flying off when you start the lathe. Risky, to say the least.
Posted: Sun Nov 23, 2008 4:27 pm
by KurtHuhn
The other solution is a nice off-shelf and neatly shrink-wrapped collection of products. And, believe me, coming from me, that's saying something (I do not like shrink-wrapped answers).
Use this chuck:
http://www.pennstateind.com/store/CMG3C.html
With these jaws:
http://www.pennstateind.com/store/LCALJAWS.html
That's a nice solution that doesn't cost an arm and a leg - and works. I use a similar setup, using a OneWay chuck and OneWay Tower jaws that, from about 4 feet away, looks identical to these. These will fit most midi and mini wood lathes on the market today, but check your spindle threads to be sure.
Posted: Wed Nov 26, 2008 8:30 pm
by Michl
Frank wrote:but with independant jaws it would be a right bugger keeping everything in place while trying to centre in 3 planes. You also run the risk of the whole kit flying off when you start the lathe. Risky, to say the least.
Earlier I had taken off two jaws and was meditating on the briar wedged between two pieces of wood held by two opposite jaws and came to the same conclusion. There's a reason you want the extensions welded to
the jaws.
Thanks for the tip!!! I went and looked at these but have a question about the C jaws. Since they center, they will pull the briar to the center, which will make it hard to center the stummel, since its center is off to one side. With the two extensions you can move the briar up and down the chuck, but it seems that there is very little up and down movement with the centering C jaws. How do you handle that?
Posted: Wed Nov 26, 2008 8:54 pm
by KurtHuhn
Eh, what now?
I'm not sure I follow you. Yes, these will center any block you put in them so that any hole you drill will be in the center of the block. Very rarely do I want to move the hole from side to side on a block of briar, and when I do want to, I just shave a hair off one side.
If you're having trouble figuring out the subtleties of getting a block of briar drilled and shaped on a lathe, this video may help:
http://blip.tv/file/303461/
I made that a little over two years ago. Grab a drink, it's about 25 minutes long.
Posted: Thu Nov 27, 2008 3:12 am
by Michl
Great video -- tolle Musik...
The question I had was how do you center a bent shank on
these (with all jaws on the chuck, but I see on the video that
you can remove individual C jaws to allow you to clamp the
briar so that you can center the bent shank per the drawing
by Frank.
Thanks again!!
M
Posted: Thu Nov 27, 2008 3:20 am
by Frank
KurtHuhn wrote:Eh, what now?
Yep. That was my exact question.
 Ein, zwei, drei?
 MEIN GOTT! Das scheiss ear poppin verdammt racketten. Again? Mein kopf ist explodin!

Posted: Thu Nov 27, 2008 4:19 am
by tritrek
Great vid!!