Cutting It Up
Posted: Tue Sep 25, 2007 7:25 am
Once your tobacco is grown and cured for awhile, you are ready to cut up your leaf and get it into a more smokable state.
There are several tools a home grower can use to chop up his tobacco -- a food processor, a paper shredder, a wood plane cutting along the edge of a pressed block, etc.
But I found that using a pair of scissors was about as easy as anything. You will need them anyway if you choose to remove the main rib, so why not just go ahead and use a pair of scissors to take your tobacco the rest of the way.
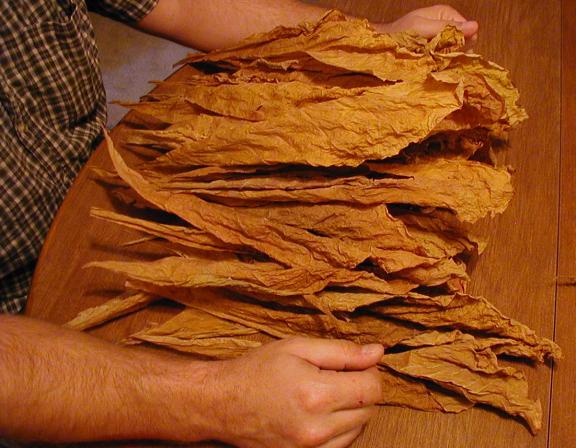
Most of my tobacco is either still growing or curing at my non-air-conditioned storage shed, but I recently had a request for some free samples, so I needed to go ahead and cut up a small batch of freshly cured tobacco to pass along.
One of the most important things to keep in mind about freshly cured tobacco is that it is a sponge. Most of the moisture has evaporated from the leaf cells, and they are now a lattice of millions upon millions of tiny air pockets surrounded by fibers.
This concept will come into play later, when we get ready to "case" our tobacco, but it also comes into play now at the cutting stage. Because you will not want to handle your tobacco much if it's so dry that it crumbles, as mine was at this particular moment.
It's funny, but freshly cured tobacco absolutely breathes moisture. I notice that mine is pliable and almost damp in the mornings, a tad on the crumbly side in the hot afternoons, and then pliable and damp again the next morning. Wild stuff, I know.
Reintroducing moisture to dry tobacco is as easy as hanging it on a towel bar in the bathroom while you take a good, hot shower. It usually takes about a half an hour to go from crumbly to pliable, in a moisture-rich environment like a steamy bathroom.

Once our tobacco is moist enough to handle, we are ready to remove the center rib.
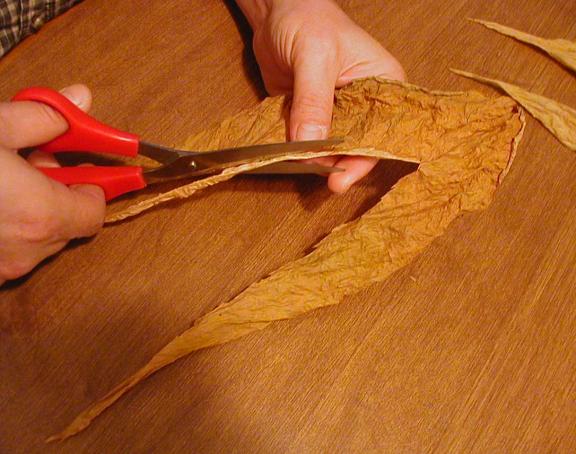
You can remove as much or as little of the ribs as you like, but I found that removing about 75 percent of the center rib was acceptable.

Once you have removed the center ribs, you are ready to start cutting.
I start off with a small handful of leaves, like three or four.

I fold the leaves in half...
twist them a little...

into a tight plug about the size of a cigar...

and start in cutting.

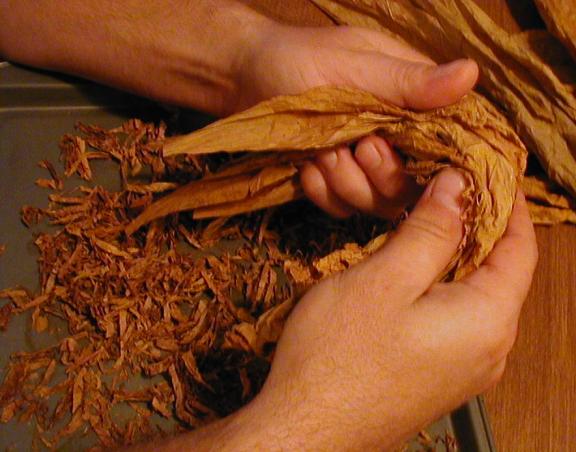
It takes a little practice, but after a few snips in the 1/8 inch thick range, you can progress to the point where you are taking snips in the 1/16 to 3/32 inch thick range. Using your thumb and finger as a guide is the ticket.
And when you are done cutting, you will wind up with a nice little batch of cut tobacco, like this one here, which took me about 20 minutes to de-rib and cut.

At this stage, you are going to be shocked at how much your tobacco resembles confetti. Like, you wouldn't want to sneeze on this stuff, or you will be vacuuming it up for days.
Not to worry, though, because we will add some sort of casing later -- molasses, honey, maple syrup, etc. -- which will take our tobacco from this confetti-like state to something more closely resembling the kind of tobacco we are familiar with.
But for right now, we are going to be aging it, at least for a few months. You can smoke your tobacco like this if you want, but you will pack your pipe full of confetti, take one puff, it will all mysteriously disappear in that one single puff, and you will find yourself coughing-out the unfamiliar spicy, green "herbal" smoke that just shocked your palate, I'm pretty sure.
You can age your tobacco in a brown paper bag, up off the floor, in a somewhat damp basement room, spare bedroom, etc., or in a humidor. If you need, but don't already have, a humidor, you can build one as simple or as fancy as you like.
How to make your own inexpensive humidor
A Look at the Humidor Plan
How to Build Your Own Humidor
HOW TO BUILD A HUMIDOR
Build Your Own
SPALTED MAPLE HUMIDOR
Cheers.
There are several tools a home grower can use to chop up his tobacco -- a food processor, a paper shredder, a wood plane cutting along the edge of a pressed block, etc.
But I found that using a pair of scissors was about as easy as anything. You will need them anyway if you choose to remove the main rib, so why not just go ahead and use a pair of scissors to take your tobacco the rest of the way.
Most of my tobacco is either still growing or curing at my non-air-conditioned storage shed, but I recently had a request for some free samples, so I needed to go ahead and cut up a small batch of freshly cured tobacco to pass along.
One of the most important things to keep in mind about freshly cured tobacco is that it is a sponge. Most of the moisture has evaporated from the leaf cells, and they are now a lattice of millions upon millions of tiny air pockets surrounded by fibers.
This concept will come into play later, when we get ready to "case" our tobacco, but it also comes into play now at the cutting stage. Because you will not want to handle your tobacco much if it's so dry that it crumbles, as mine was at this particular moment.
It's funny, but freshly cured tobacco absolutely breathes moisture. I notice that mine is pliable and almost damp in the mornings, a tad on the crumbly side in the hot afternoons, and then pliable and damp again the next morning. Wild stuff, I know.
Reintroducing moisture to dry tobacco is as easy as hanging it on a towel bar in the bathroom while you take a good, hot shower. It usually takes about a half an hour to go from crumbly to pliable, in a moisture-rich environment like a steamy bathroom.
Once our tobacco is moist enough to handle, we are ready to remove the center rib.
You can remove as much or as little of the ribs as you like, but I found that removing about 75 percent of the center rib was acceptable.
Once you have removed the center ribs, you are ready to start cutting.
I start off with a small handful of leaves, like three or four.
I fold the leaves in half...
twist them a little...
into a tight plug about the size of a cigar...
and start in cutting.
It takes a little practice, but after a few snips in the 1/8 inch thick range, you can progress to the point where you are taking snips in the 1/16 to 3/32 inch thick range. Using your thumb and finger as a guide is the ticket.
And when you are done cutting, you will wind up with a nice little batch of cut tobacco, like this one here, which took me about 20 minutes to de-rib and cut.
At this stage, you are going to be shocked at how much your tobacco resembles confetti. Like, you wouldn't want to sneeze on this stuff, or you will be vacuuming it up for days.
Not to worry, though, because we will add some sort of casing later -- molasses, honey, maple syrup, etc. -- which will take our tobacco from this confetti-like state to something more closely resembling the kind of tobacco we are familiar with.
But for right now, we are going to be aging it, at least for a few months. You can smoke your tobacco like this if you want, but you will pack your pipe full of confetti, take one puff, it will all mysteriously disappear in that one single puff, and you will find yourself coughing-out the unfamiliar spicy, green "herbal" smoke that just shocked your palate, I'm pretty sure.
You can age your tobacco in a brown paper bag, up off the floor, in a somewhat damp basement room, spare bedroom, etc., or in a humidor. If you need, but don't already have, a humidor, you can build one as simple or as fancy as you like.
How to make your own inexpensive humidor
A Look at the Humidor Plan
How to Build Your Own Humidor
HOW TO BUILD A HUMIDOR
Build Your Own
SPALTED MAPLE HUMIDOR
Cheers.
