I am working on a bamboo shanked pipe with a reverse tenon and have just glued on my 2mm plate ebonite spacer. After drilling my stem and fitting the stem, I have the most minimal of light gaps, and cannot seem to eliminate it.
While the stem material was still chucked into the wood lathe, I have tried drilling the mortise in the stem just a hair deeper than needed, and that did not work. I tried re-facing the stem with multiple different Forstner bits, and that did not work either. I also made sure to countersink the stem thinking that might be the problem. That also did not work.
My thought is that either the face of my bamboo was not perfectly square before i glued on the plate ebonite, or that the plate ebonite is not milled perfectly square, or that somehow in drilling, the Forstner bit is not cutting the ebonite perfectly square.
Here are some things I am thinking of trying to remedy this, and I would appreciate any advice as to whether or not you think this might work.
Definitely re-sharpening my Forstner bits.
I am thinking of making a sanding ring by taking a scrap piece of ebonite, facing it, drilling out a mortise all the way through that is just slightly oversized to the normal 3/16, and then gluing a piece of sandpaper that has been hole punched at 3/16 on the face of the sanding ring. Then this can be slid over the 3/16 stainless and with slow even pressure, possibly sand down any high spots on the plate ebonite spacer. The reason I am thinking oversized is that I don't want a tight fit to the ring so that as I sand it, heat builds up on the stainless tenon and glue joint. I hope that makes sense.
I am thinking of making these in 400, 600, and possibly 800 grit as well.
Does this seem like something that would work? I feel like it would only work if the issue is coming from the plate ebonite side of the junction. If the issue is coming from the stem side, I would most likely have to reverse the process, and make a bunch of sanding tools that are faced perfectly square, have sandpaper glued onto them, and have stainless tenons glued into them.
I would love to know your thoughts on this.
Eliminating tiny light gaps
-
Rbraniganpipes

- Posts: 136
- Joined: Thu Mar 19, 2015 11:37 am
- Location: Madison Heights, Virginia
- Contact:
Eliminating tiny light gaps
R.Branigan Pipes
-
dogcatcher
- Posts: 162
- Joined: Thu Feb 14, 2013 2:40 am
- Location: Abilene TX or Ruidoso NM
Re: Eliminating tiny light gaps
I am not much of a pipemaker. But in my opinion I would use an end mill with a removable pilot bit that is the same as your tenon.
It is a machinist tool bit used on a milling machine.
Personally I would visit a machine shop. Explain the problem and get their 2 cents. They probably will sell you what you need.
It is a machinist tool bit used on a milling machine.
Personally I would visit a machine shop. Explain the problem and get their 2 cents. They probably will sell you what you need.
-
LatakiaLover
- Posts: 3120
- Joined: Sun Sep 02, 2007 4:29 am
- Location: Kansas City, USA
- Contact:
Re: Eliminating tiny light gaps
Does this seem like something that would work? (you asked)...
Such squaring tools work fine in theory, but not in practice.
Here's why, as well as an approach that does:
https://www.youtube.com/watch?v=waZaX9J ... x0&index=1
Such squaring tools work fine in theory, but not in practice.
Here's why, as well as an approach that does:
https://www.youtube.com/watch?v=waZaX9J ... x0&index=1
UFOs must be real. There's no other explanation for cats.
-
dogcatcher
- Posts: 162
- Joined: Thu Feb 14, 2013 2:40 am
- Location: Abilene TX or Ruidoso NM
Re: Eliminating tiny light gaps
I like the video. Add a layer of sandpaper to the drill stop collar. You need a rod the size of the tenon., the drill stop collar and some sandpaper. This will work the same as the end mill I previously mentioned
-
Rbraniganpipes
- Posts: 136
- Joined: Thu Mar 19, 2015 11:37 am
- Location: Madison Heights, Virginia
- Contact:
Re: Eliminating tiny light gaps
Thanks George! That video is spot on for what I was originally thinking. I should have thought to check your YouTube channel, as you’ve got so many great tips and tricks on there that you’ve shared with all of us!LatakiaLover wrote: ↑Sun Oct 22, 2023 7:30 pm Does this seem like something that would work? (you asked)...
Such squaring tools work fine in theory, but not in practice.
Here's why, as well as an approach that does:
https://www.youtube.com/watch?v=waZaX9J ... x0&index=1
Thinking that if the issue is with the spacer, the faced and glued sanding jig slid onto the 3/16 stainless tenon may be my only option to attempt to solve that. If the issue is with the stem I’ve made with the reverse tenon, then I could try pin gauges. My trouble is that it is very hard to be precise with a wood lathe and hand cutting tools. The sandpaper and hard even surface idea would work if the issue is with the stem face not being square, although Ive been quite heavy handed with that method in the past.
R.Branigan Pipes
-
Rbraniganpipes
- Posts: 136
- Joined: Thu Mar 19, 2015 11:37 am
- Location: Madison Heights, Virginia
- Contact:
Re: Eliminating tiny light gaps
I tried exactly what George’s video suggested regarding the hard surface and sandpaper, and my light gap is gone. I appreciate you saving me a ton of time and aggravation!!!
R.Branigan Pipes
-
LatakiaLover
- Posts: 3120
- Joined: Sun Sep 02, 2007 4:29 am
- Location: Kansas City, USA
- Contact:

Re: Eliminating tiny light gaps
If the pipe is past the lathe work and I didn't catch it, I do George's sandpaper on a hard flat surface method. The only thing I will add is that I drag the pipe in figure 8 to get the most even sanding.
-
Rbraniganpipes
- Posts: 136
- Joined: Thu Mar 19, 2015 11:37 am
- Location: Madison Heights, Virginia
- Contact:
Re: Eliminating tiny light gaps
The dragging idea was a bit scary to me just because of the idea of chatter or uneven pressure on the material. Instead of dragging it, I took a full piece of sandpaper and laid it on my hard flat surface, held the piece down as hard as I could to the flat surface, and spun the sheet of sandpaper. It worked well.
R.Branigan Pipes
-
Rbraniganpipes
- Posts: 136
- Joined: Thu Mar 19, 2015 11:37 am
- Location: Madison Heights, Virginia
- Contact:
Re: Eliminating tiny light gaps
The dragging idea was a bit scary to me just because of the idea of chatter or uneven pressure on the material. Instead of dragging it, I took a full sheet of sandpaper and laid it on my hard flat surface, pressed the piece down that I needed to sand as hard as I could into the sandpaper and then spun the sheet of sandpaper around in circles. It worked well.
R.Branigan Pipes
Re: Eliminating tiny light gaps
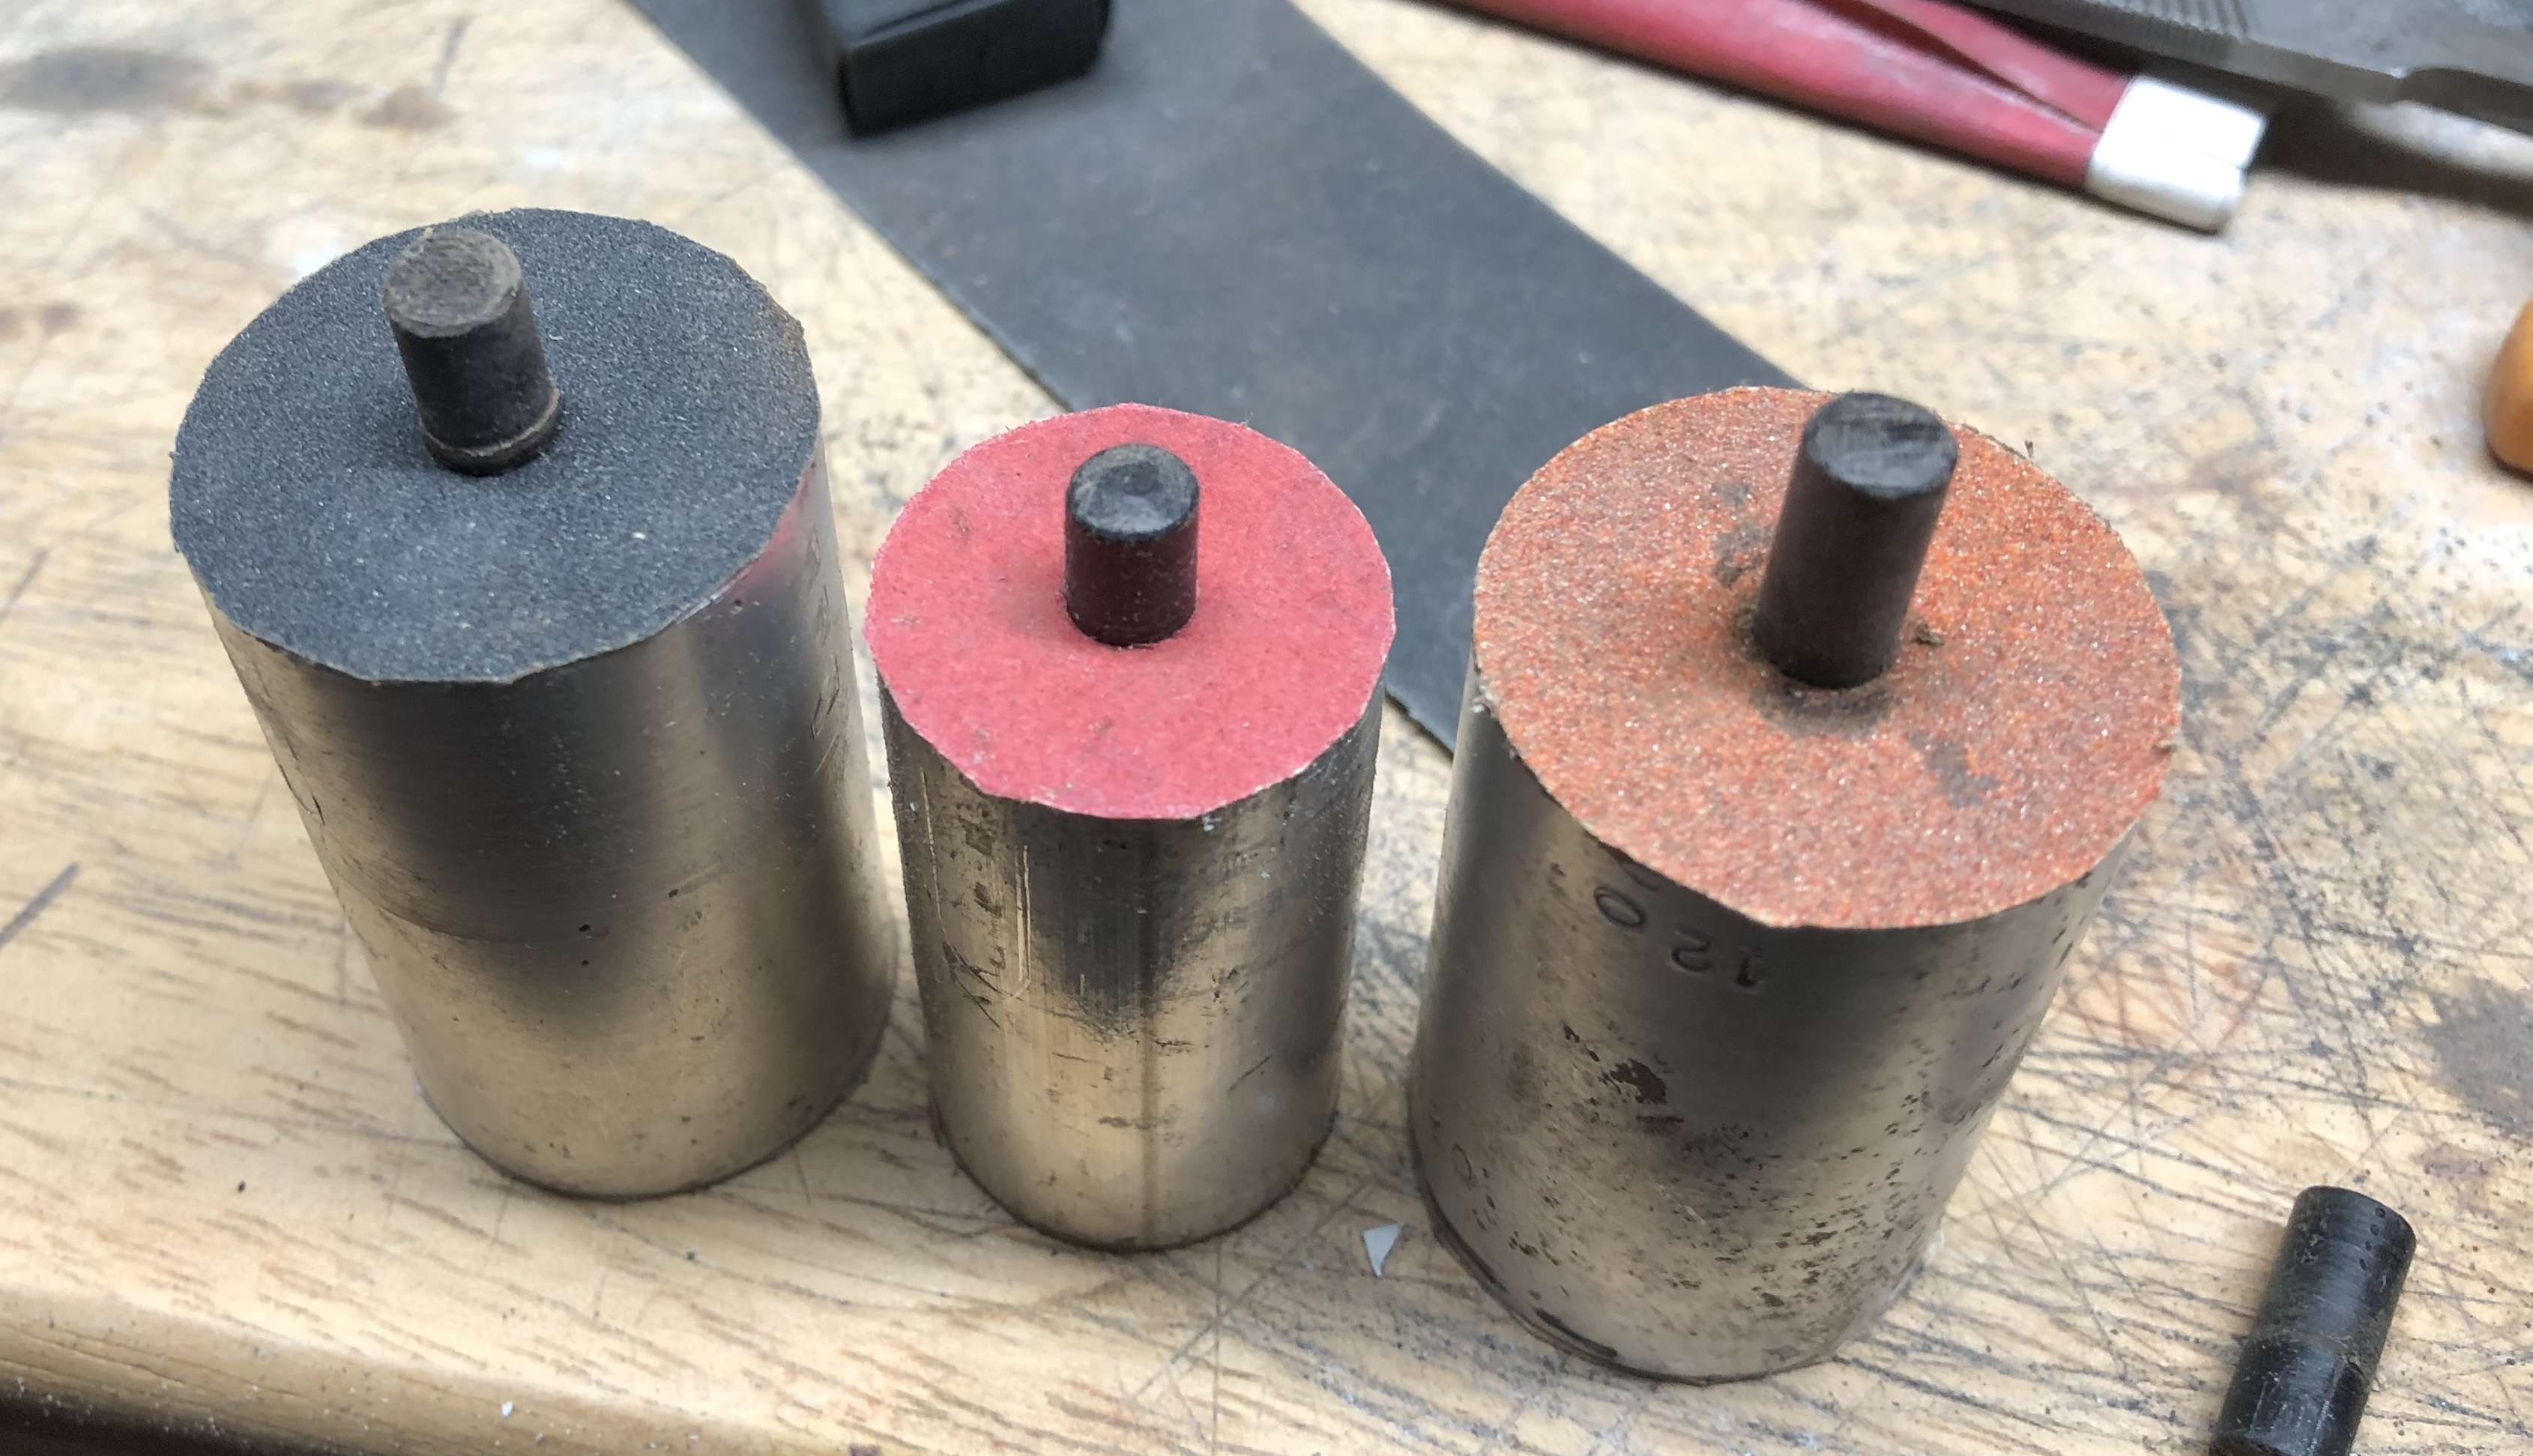
I use essentially the method that you hypothesize in the OP but I use Delrin pilots instead of the SS rod.
You do have to be careful when hand turning the sanding cylinders because the Delrin is flexible and if you are ham handed, you can screw up the face.
For new pipes, I occasionally get a light gap, but I only use 2 sizes of tenon- 1/4” and 5/16”. Since these are standard sized of Delrin, the pilots seen in the photo are easy to make.
The cutting cylinders in these are aluminum, but I have gone to ebonite for other sizes.
I use these in succession- 120, 220, 340 , 400 and I glue paper to both ends so that when one end loads, I use the other end. I rarely go over 400 on the shank face. I do drag the shank face over a piece of 400 to remove the circular scratches at the last.
I occasionally do a repair on an odd size mortise, and then I turn one end of the pilot to size to fit the cylinder and the other to fit the mortise.If the mortise is larger than 5/16”, I use 3/8” or 1/2”.
"Hettinger, if you stamp 'hand made' on a dog turd, some one will buy it."
-Charles Hollyday, pipe maker, reluctant mentor, and curmudgeon
" Never show an idiot an unfinished pipe!"- same guy
-Charles Hollyday, pipe maker, reluctant mentor, and curmudgeon
" Never show an idiot an unfinished pipe!"- same guy