Page 1 of 1
Video project #3 just added - Rebuilding an ornamental shank
Posted: Sun May 27, 2018 9:56 pm
by LatakiaLover
Re: Video project #3 just added - Rebuilding an ornamental s
Posted: Mon May 28, 2018 9:11 am
by RickB
Oh shit I've got some homework to do. Thanks again for doing these.
Re: Video project #3 just added - Rebuilding an ornamental s
Posted: Mon May 28, 2018 3:16 pm
by caskwith
Hmmm now that is an interesting one. I think I might have done things differently but I certainly enjoyed seeing your process and reasoning.
Re: Video project #3 just added - Rebuilding an ornamental s
Posted: Mon May 28, 2018 3:45 pm
by LatakiaLover
And I'd enjoy knowing a Legit Tool Guy's take on it. Shop shit is what runs in my veins, Chris. If you have time to explain what your approach would have been, please do.
(If it involves driving on the wrong side of the road, though, or adding an extra "i" to the word "aluminum", never mind. No can do...)

Re: Video project #3 just added - Rebuilding an ornamental s
Posted: Mon May 28, 2018 5:13 pm
by caskwith
Obviously I am saying this without the benefit of having the pipe in hand, so this is just how I think I would approach the problem.
I would chuck up the horn and bore it out to remove the old glue and briar. Chuck up the stummel and bore it out, fit a briar dowel, glue the horn back on, drill a new mortise and fit a stainless tube to join the new mortise to the old airway, strengthening the shank and solving the airway cleaning issue too.
Re: Video project #3 just added - Rebuilding an ornamental s
Posted: Mon May 28, 2018 6:40 pm
by LatakiaLover
Thanks, Mr. A.

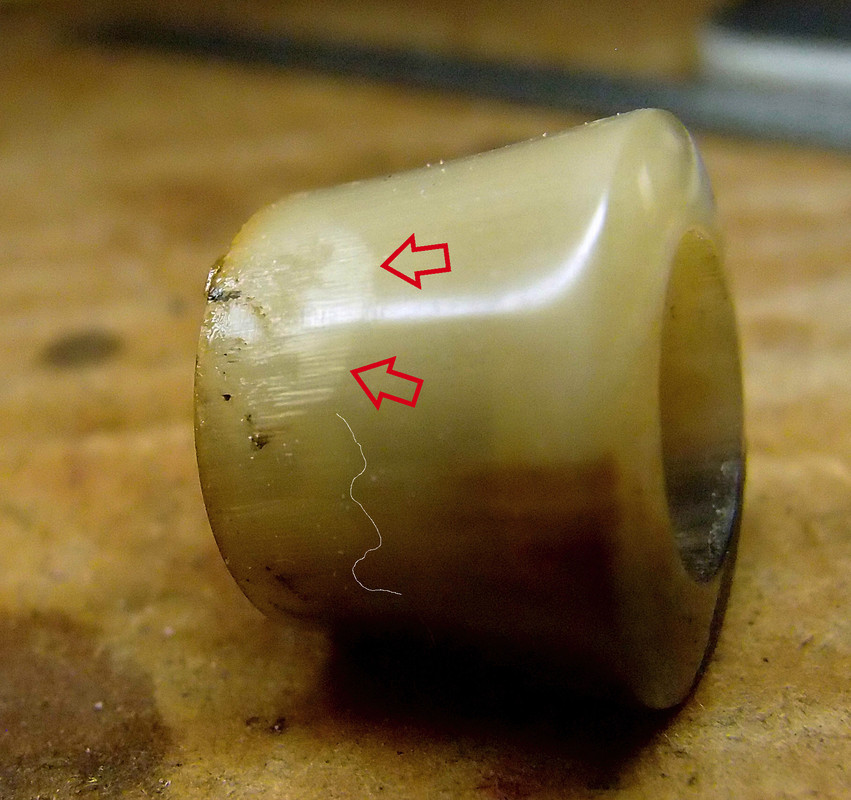
Besides not liking horn structurally as a categorical thing (I've seen too much shit with it over the years), in this case the original extension wasn't re-usable because de-lamination/splitting was well underway throughout.
Here's a close-up shot where it can be seen close to the surface, and the white line follows the contour of another split deeper inside. This sort of disintegration is what caused the glue weakness that allowed the break in the first place, I think. (The pipe's owner said the drop that snapped it off was a gentle one.)
In short, the horn segment would likely have come apart from chucking, cutting, etc. if re-use had been attempted (and almost certainly shortly afterward had it survived the processing.)
.
Re: Video project #3 just added - Rebuilding an ornamental s
Posted: Tue May 29, 2018 1:34 am
by caskwith
Ahh, well in that case I would have replaced with new horn or faux horn, depending on the customers request.
Re: Video project #3 just added - Rebuilding an ornamental s
Posted: Tue May 29, 2018 9:36 am
by Ocelot55
Another great series of videos, George!
A few quick questions. I didn't see the pipe in hand and this method is dependent on the pipe's geometry, but wouldn't it have been possible to tie the stummel and the new extension together with a tube of delrin? And if that holds true couldn't you have chucked the pipe up on a pin gauge and re-faced the the end of the shank?
Re: Video project #3 just added - Rebuilding an ornamental s
Posted: Tue May 29, 2018 2:14 pm
by LatakiaLover
The airway in the stummel angled upward almost immediately. It's why I had to shorten the shank freehand instead of use a pin gauge + lathe.
The overall geometry was goofy. That's why I went on a bit about makers who sketch swoopy designs and then retrofit plumbing to them... there's no such thing as a free lunch.
Re: Video project #3 just added - Rebuilding an ornamental s
Posted: Tue May 29, 2018 3:45 pm
by RickB
This was really great George - just finished up watching this morning. As a dumbass impressionable newbie, I definitely have been guilty of exactly what happened here - not that I expect any of the pipes I'm making at this point to get smoked and loved for 50 years, but it's definitely something I'll try to avoid in the future.
The way I've done that multi-angle extension thing - which is admittedly probably not even the right way to do the wrong thing, but I'm doing a lot of putzing around and trying to figure shit out still - has been to chuck the block, drill the airway, rotate the block and drill the chamber, realign the block and face the shank/drill & countersink the mortise, and then to turn a tenon on the end of the shank and fit the extension/decoration over that (which conveniently/damningly covers the keyhole). And here I was thinking I was being a Good Boy for cleaning up after myself

Hell, I may even stop drawing shapes and then airways when I'm planning things

Re: Video project #3 just added - Rebuilding an ornamental s
Posted: Tue May 29, 2018 4:16 pm
by W.Pastuch
Wow George, awesome job! Not because you did a good job, that's kinda boringly obvious by now, but because you refrained from basically remaking the whole pipe from scratch to fix it's inherent problems

I use horn quite often but it never plays any structural role, it's supposed to be just a decoration, like a piece of clothing for the pipe, then it can be thin, cracked, delaminated, whatever, doesn't influence the integrity of the pipe.
Also, why in the world was that pipe drilled that way, it is barely bent at all...
I'm sure your client will be very happy whem he gets it back

,
Re: Video project #3 just added - Rebuilding an ornamental s
Posted: Tue May 29, 2018 10:17 pm
by Ratimus
W.Pastuch wrote:Wow George, awesome job! Not because you did a good job, that's kinda boringly obvious by now, but because you refrained from basically remaking the whole pipe from scratch to fix it's inherent problems
I use horn quite often but it never plays any structural role, it's supposed to be just a decoration, like a piece of clothing for the pipe, then it can be thin, cracked, delaminated, whatever, doesn't influence the integrity of the pipe.
Also, why in the world was that pipe drilled that way, it is barely bent at all...
I'm sure your client will be very happy whem he gets it back
,
I think the airway may have been angled upward in order to leave more meat under the tobacco chamber. That's my guess, anyway.
George, a million thanks for sharing these videos, and a couple questions:
1. It looked like the original mortise was drilled with a keyhole. If that's the case, could the airway have been reamed given the original (though inferior) design?
2. Did you sand the shank all the way down to the bottom of the original mortise? I can't imagine leaving an inaccessible void between the old mortise and the face of the new extension, so I'm sure I'm missing something. It's also entirely possible that you did address it and I just didn't catch it.