Want to show you work to the world? Want a place to post photos of your work and solicit the opinions of those that have gone before you? Post your work here.
Hey there,
I'm new here and new to pipe making. Since I'm German, please bear with me regarding language lapses and proper nomenclature. Corrections welcome.
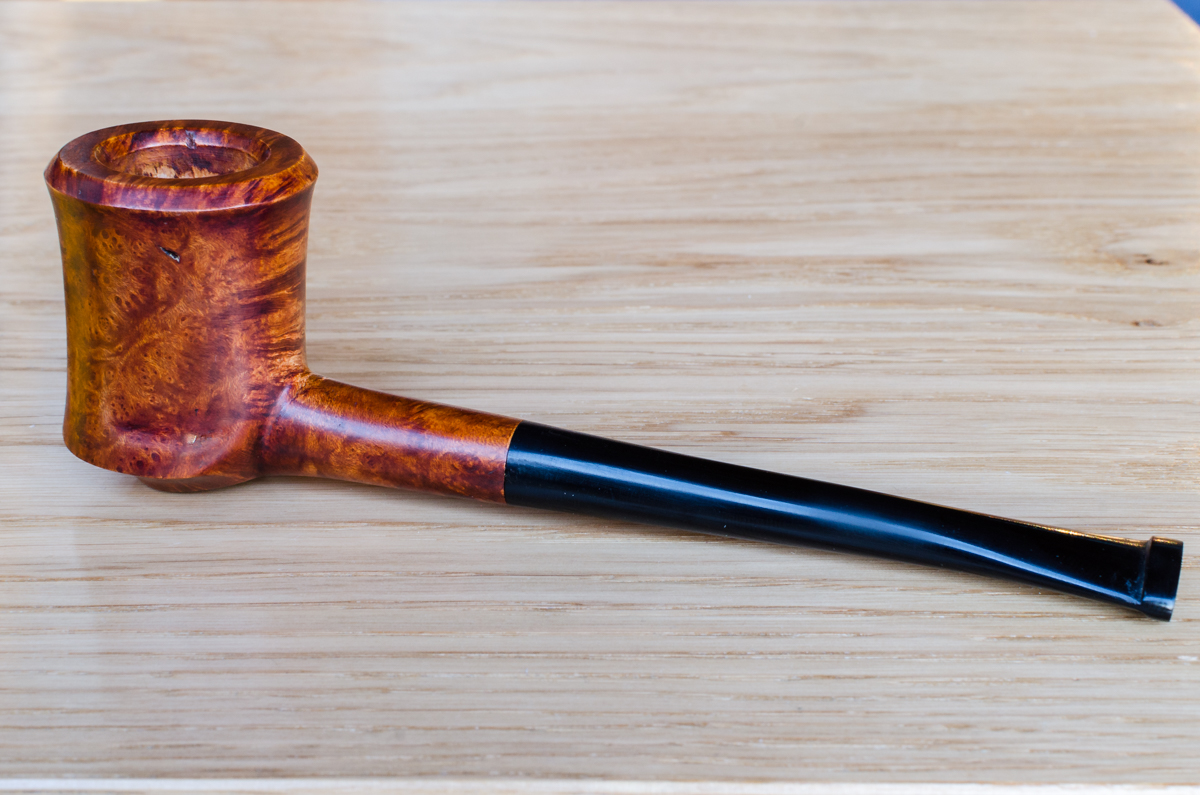
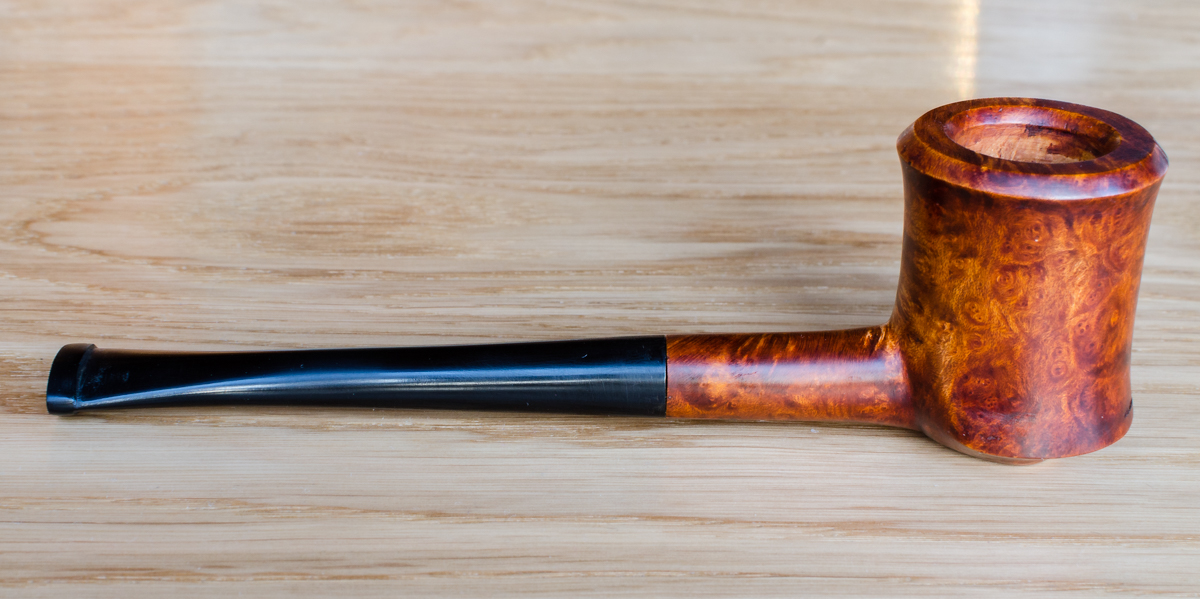
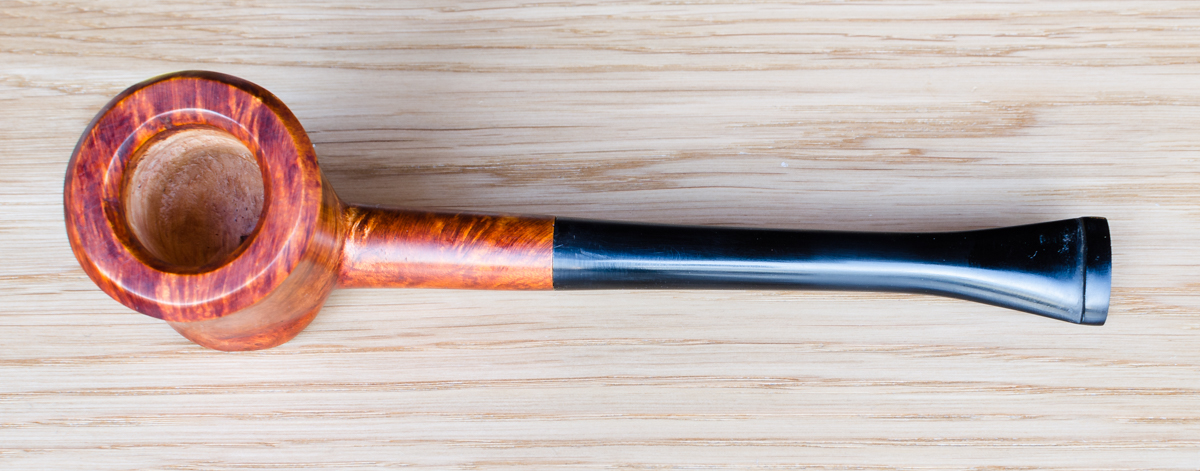
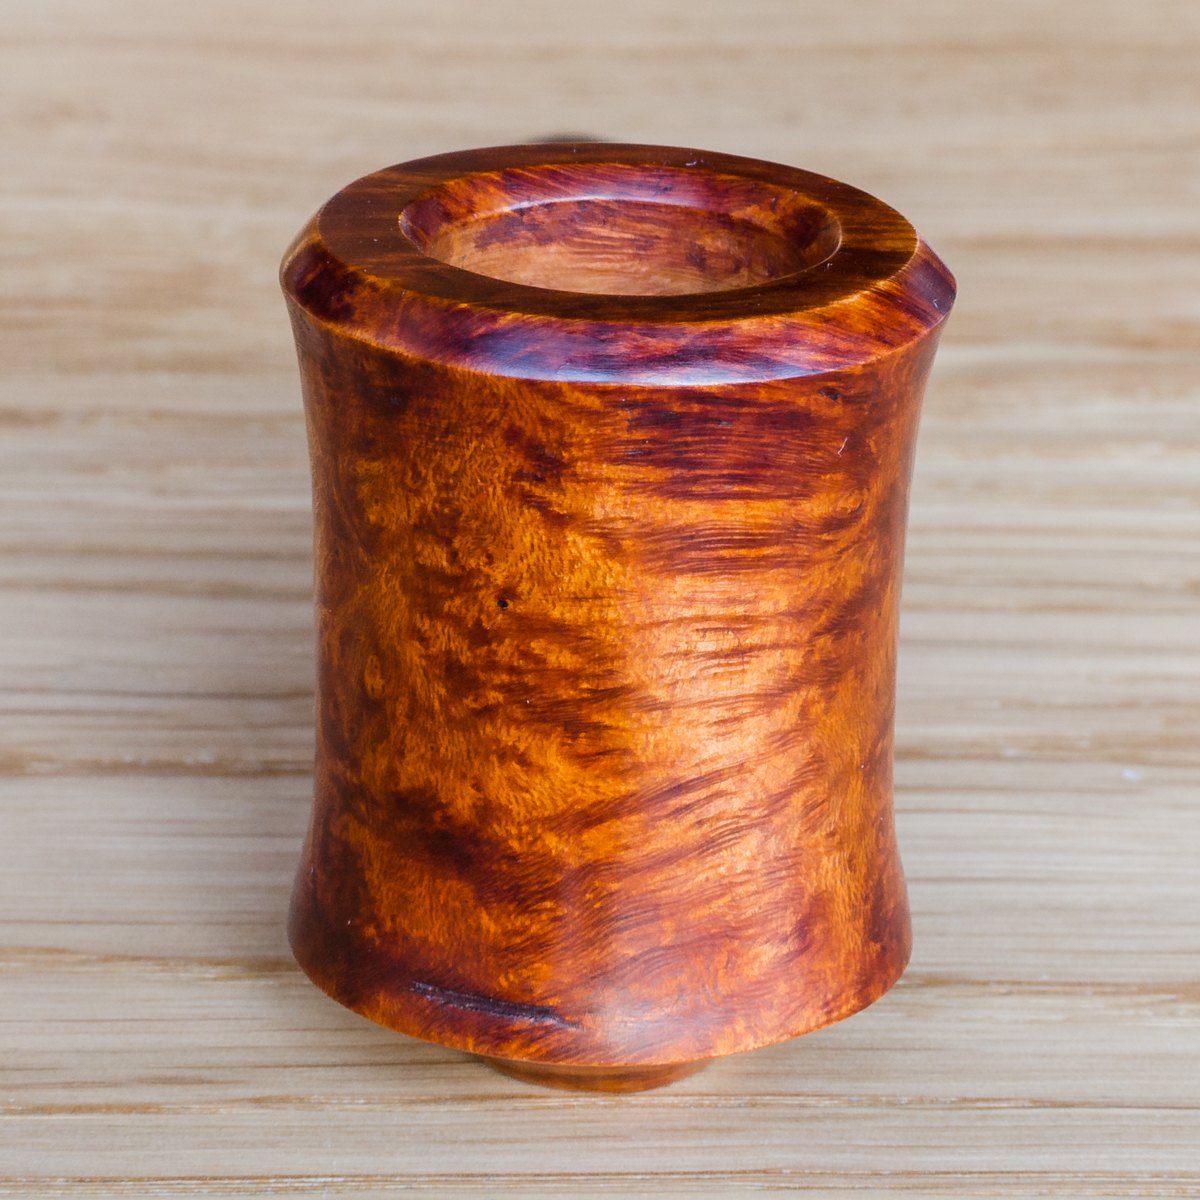
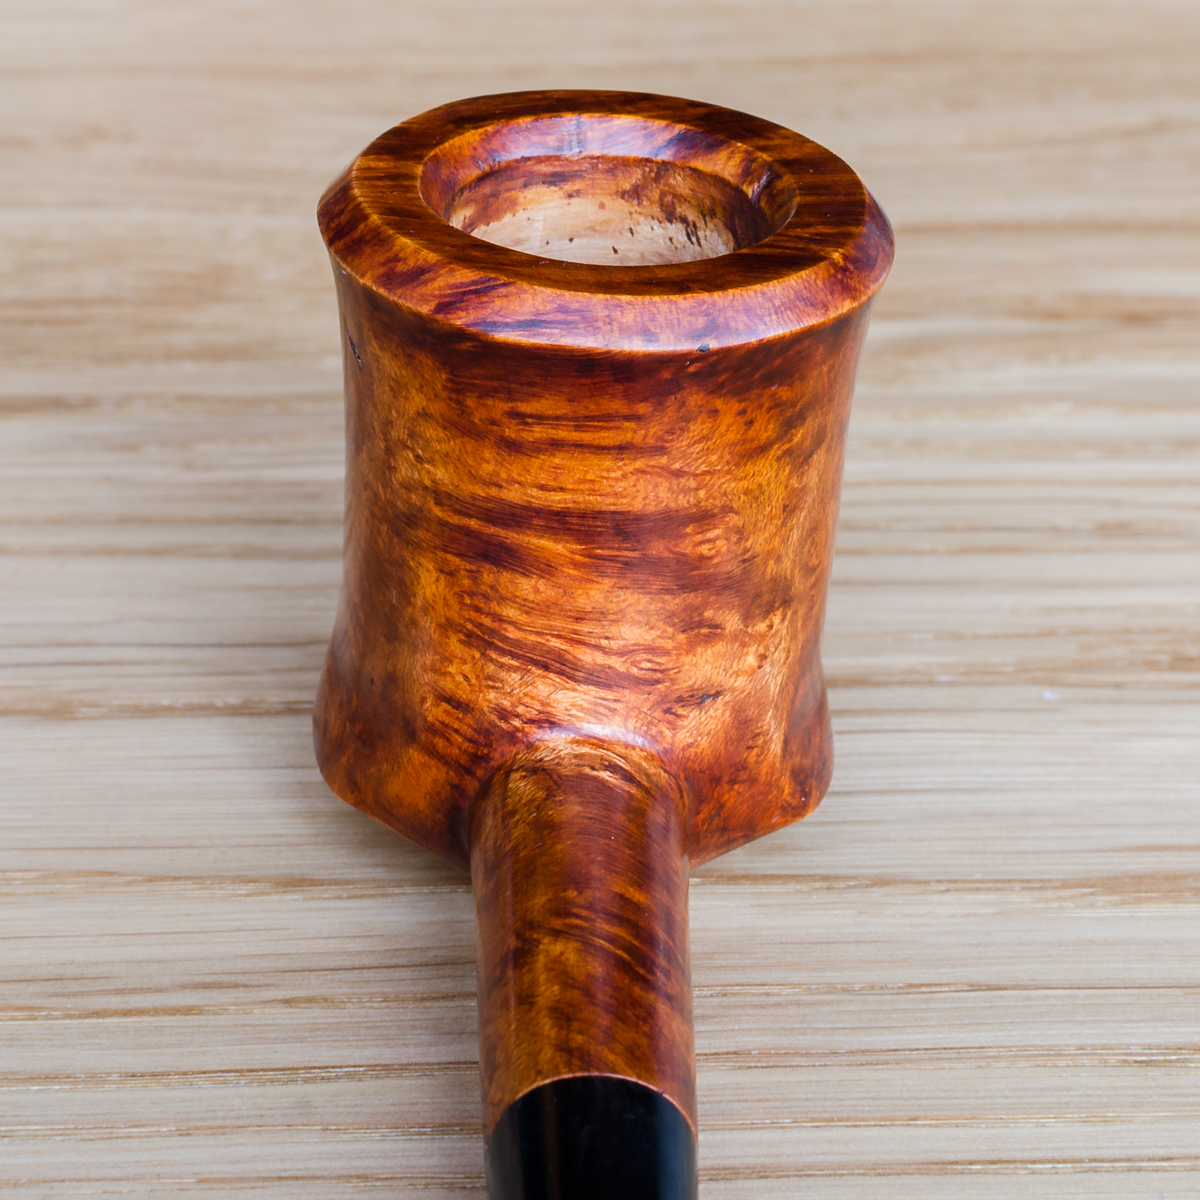
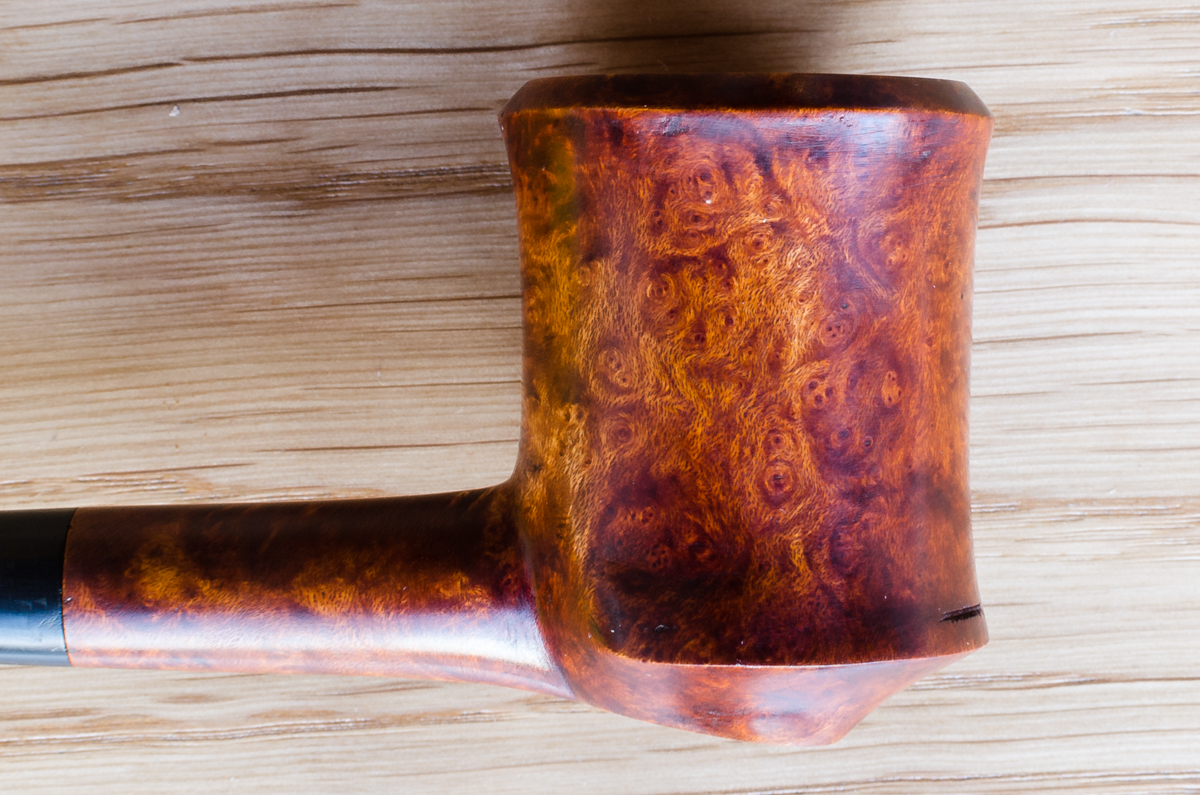
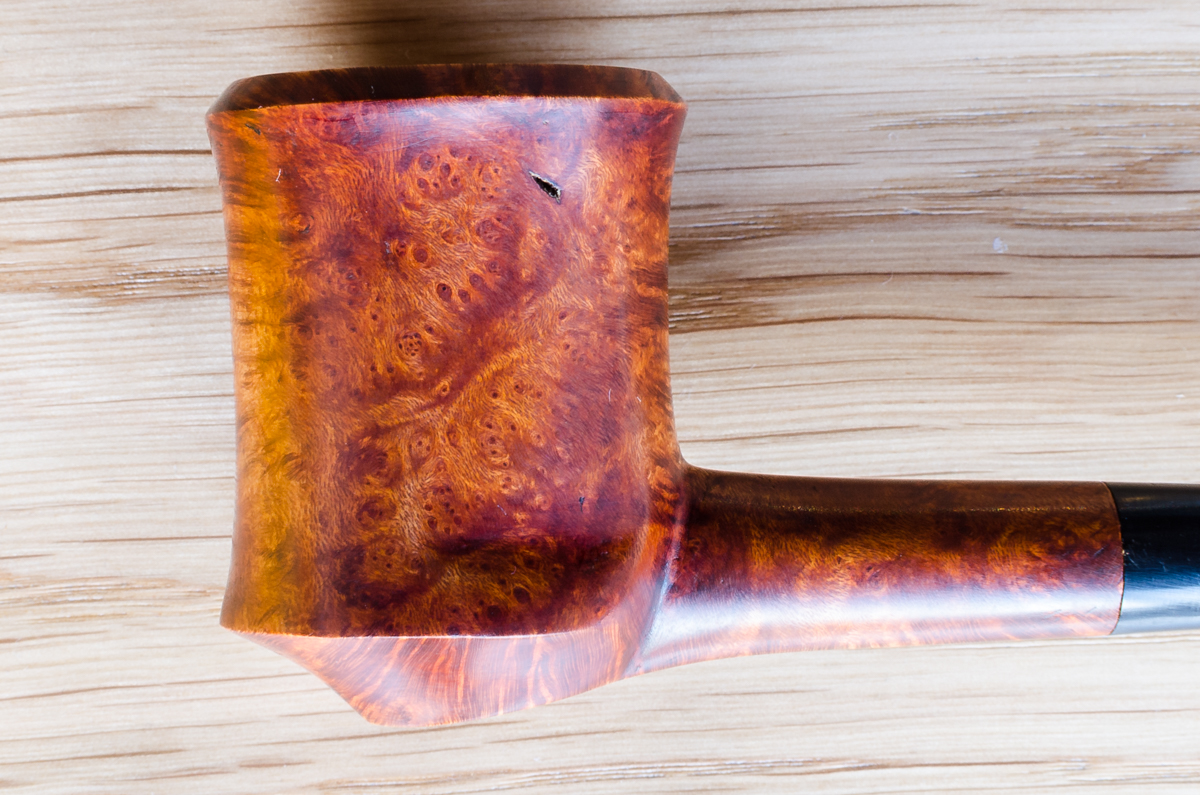
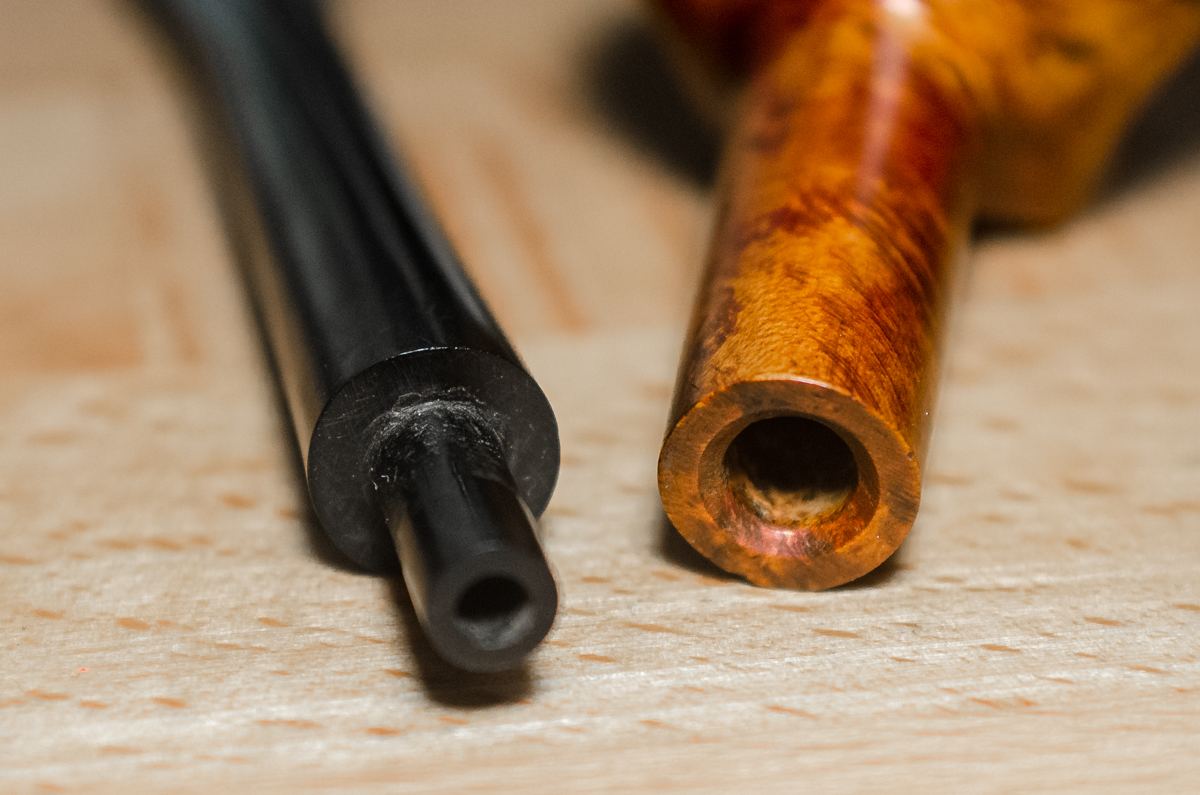
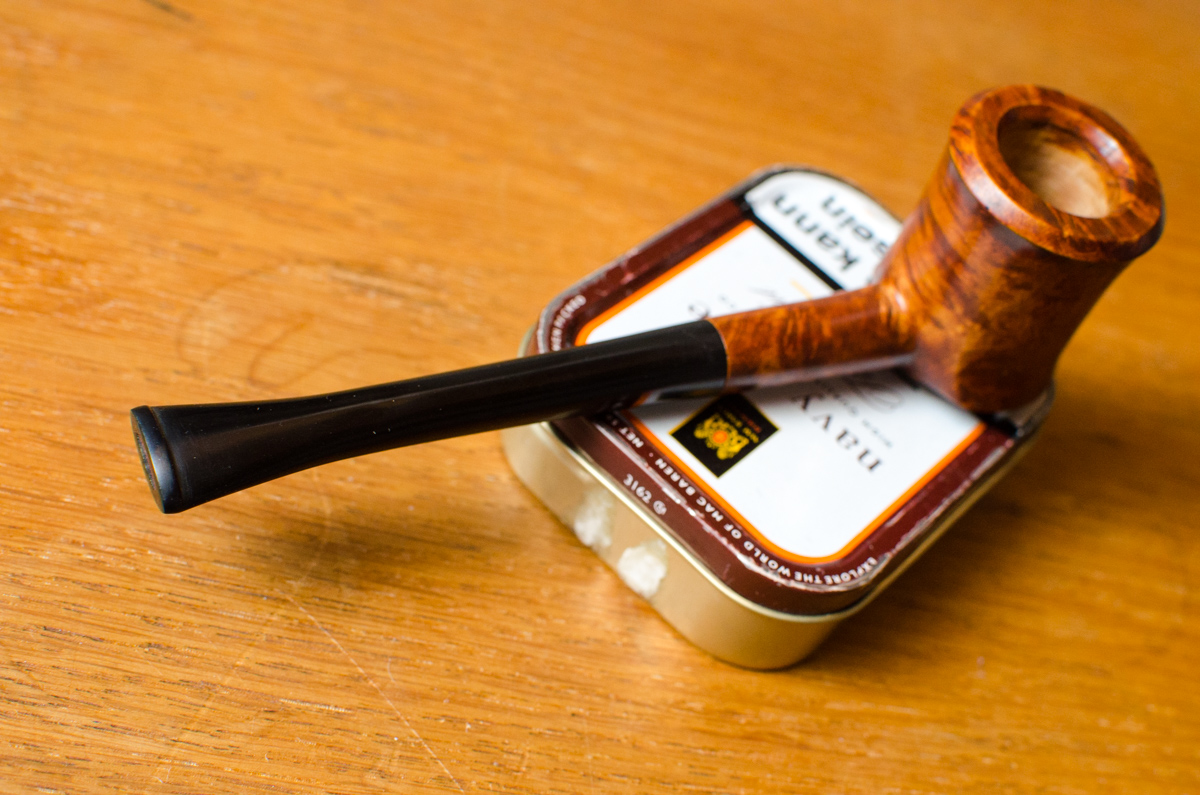
Last month I got a block of briar and tried to make a pipe. The mouthpiece is from ebonite and I put a coat of shellac on the finished head.
I have no machines, so I have only used hand tools for this, mostly a saw, chisel, rasp, card scraper and file. I have done a bit of woodworking, so this probably helped.
It's obvious, I made a number of mistakes, but I hope to have learned from them. Anyway, I enjoyed the process a lot.
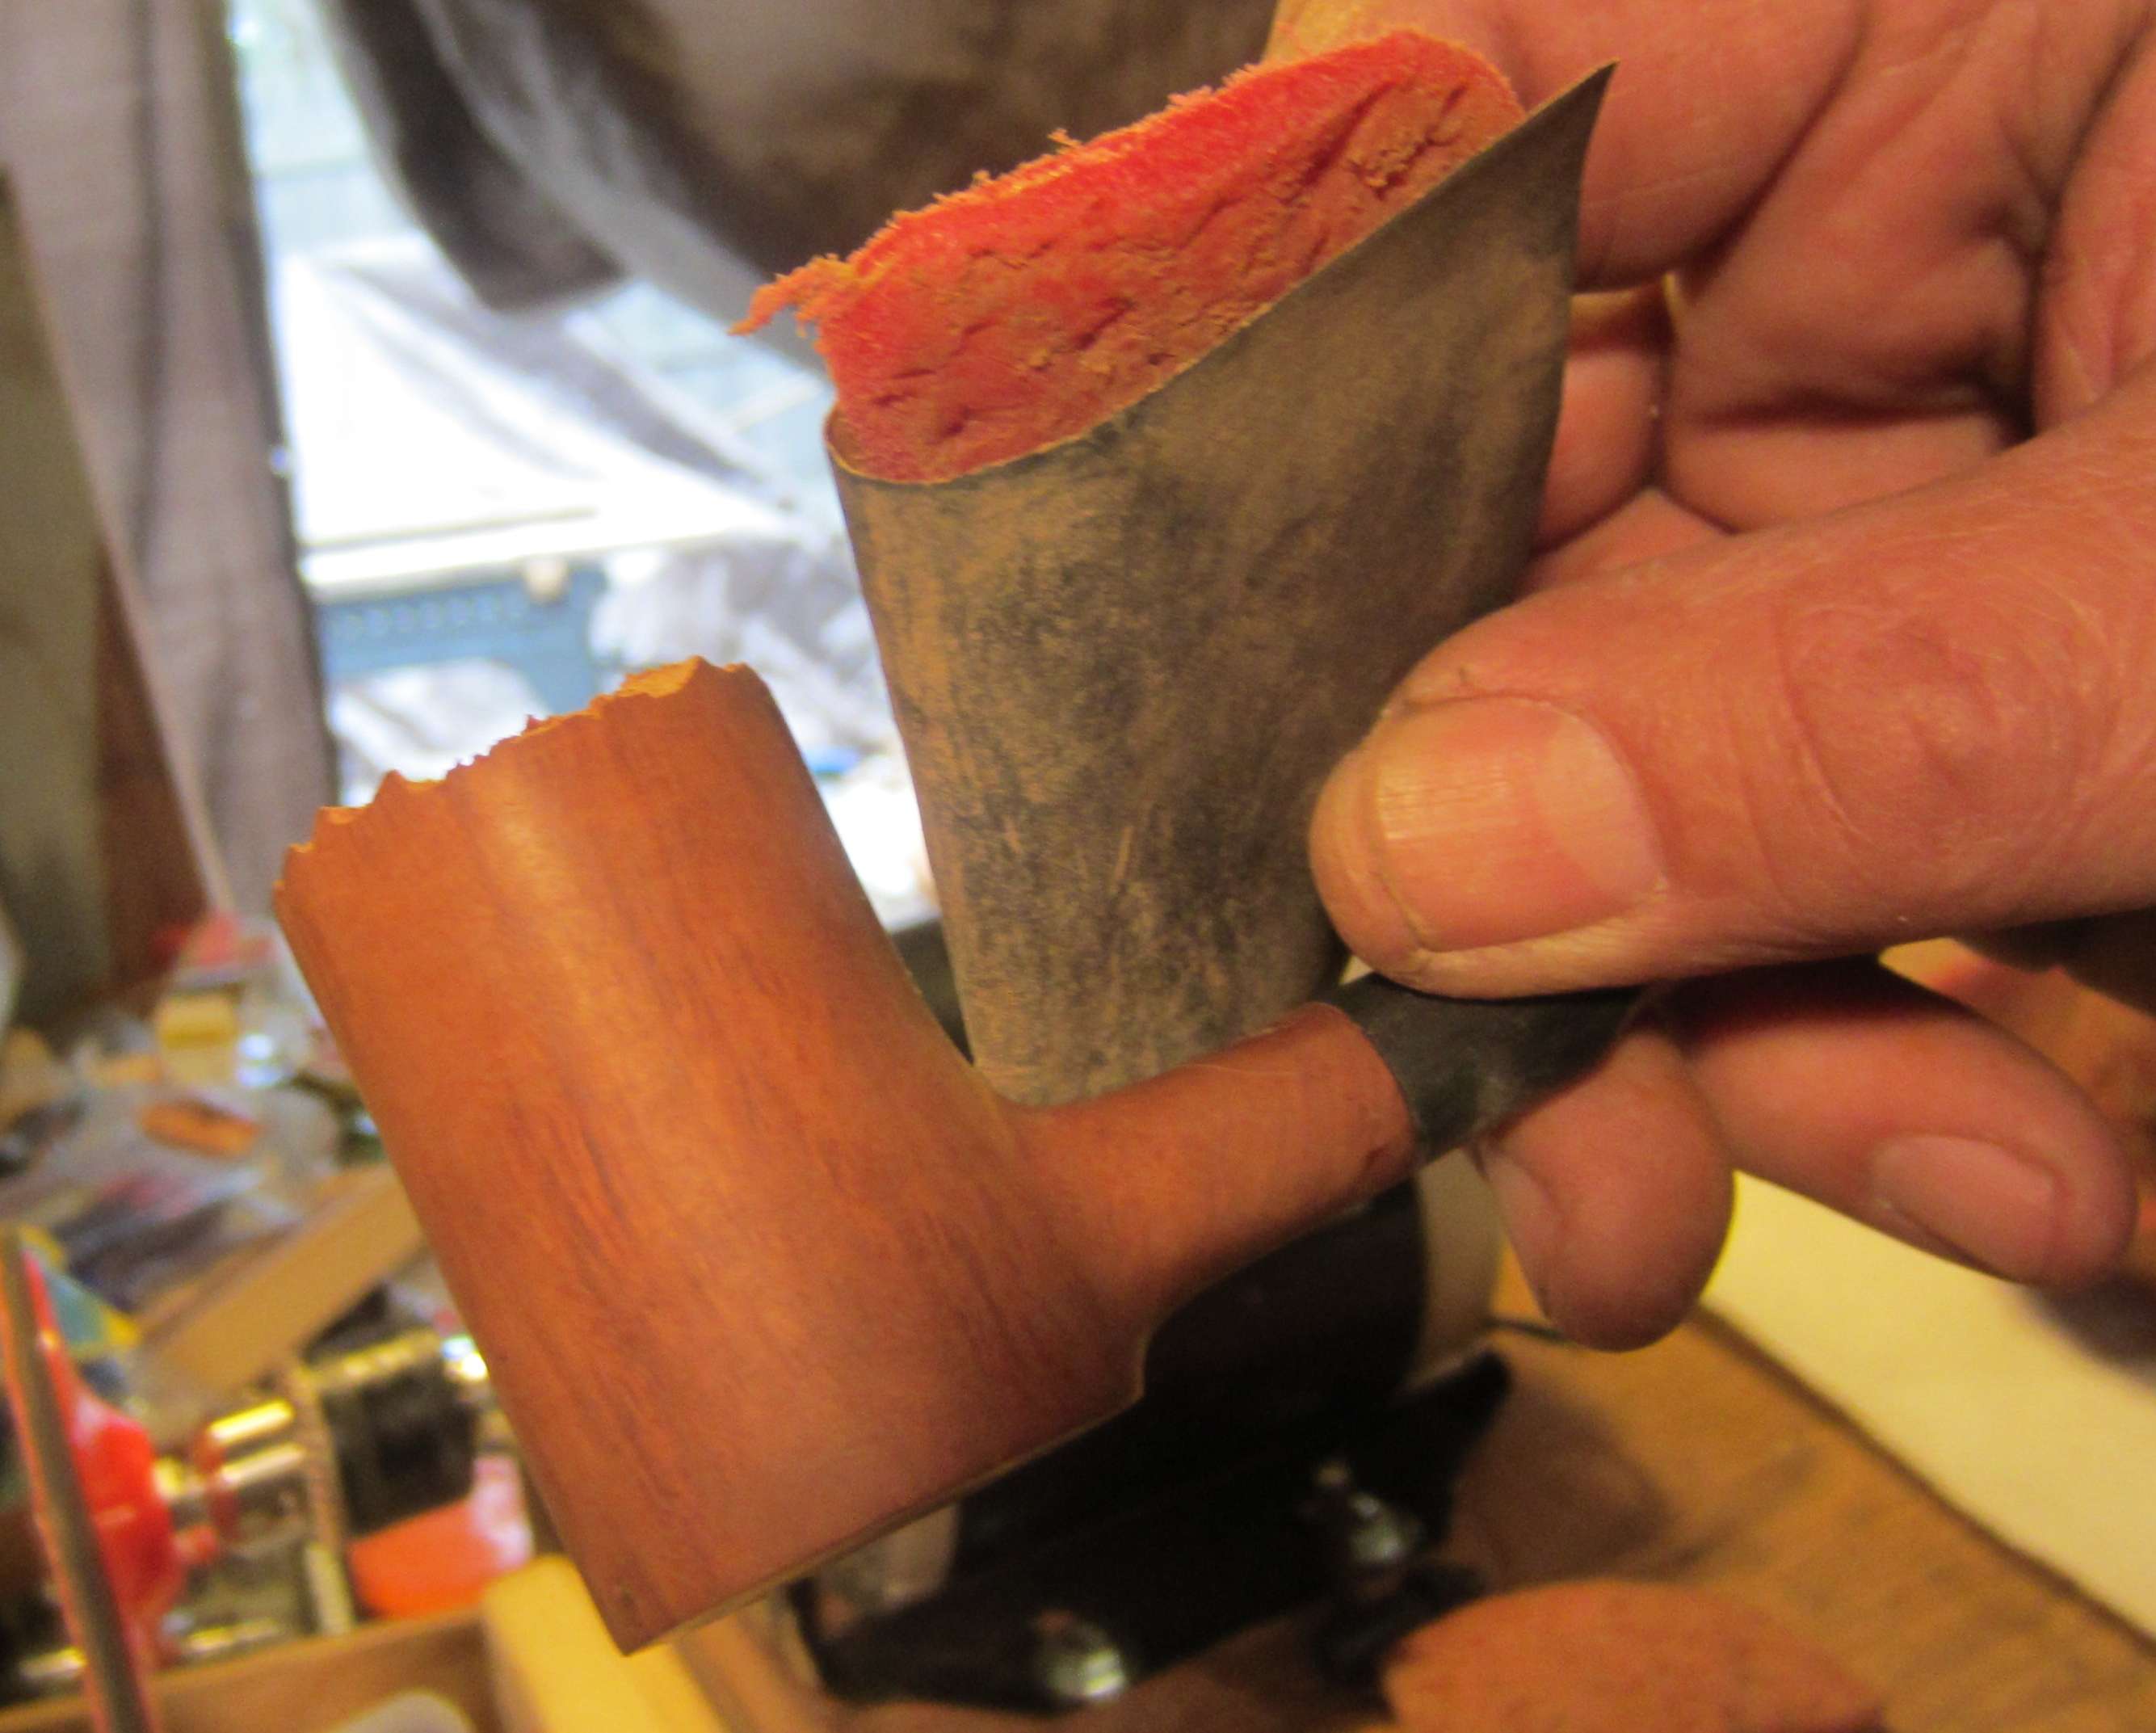
Later, I redid the button a little bit:
Questions and comments are welcome. Thanks.
(If the images width is a problem, let me know and I'll fix it)
Your English is sufficient. I lived in Dresden for 5 years, and it's always nice to meet someone from Germany.
For the next pipe you make, a few suggestions.
1. Make sure you remove all the sanding scratches before you apply stain. You have darker spots under the ridges that come from being sanded less smooth than the middle of the bowl. Then when you're buffing, take care not to buff too hard so your stain stays on the bowl evenly all the way around.
2. Work on fitting the stem flush. This usually involves making sure you sand with the stem attached. But there's lots of good information on getting a flush fit on the forum.
3. Make sure to remove all the sanding spots from your stem. The shine will be better and more even if you get them all out.
This is a much nicer pipe than my first attempt. Keep at it and I'll look forward to seeing your future work.
---
Fail early, fail often. Your success depends on it.
sandahlpipe wrote:1. Make sure you remove all the sanding scratches before you apply stain. You have darker spots under the ridges that come from being sanded less smooth than the middle of the bowl. Then when you're buffing, take care not to buff too hard so your stain stays on the bowl evenly all the way around.
That's a good point with the buffing. I tried to sand down the contrast stain, but that didn't work too well, so I wiped it with alcohol, which gave a more consistent result. Then I didn't pay enough attention while buffing.
sandahlpipe wrote:2. Work on fitting the stem flush. This usually involves making sure you sand with the stem attached. But there's lots of good information on getting a flush fit on the forum.
Seems I did some sanding with the stem not attached, which results in some round-over. I'll check what I can find in the Stem Work section.
sandahlpipe wrote:3. Make sure to remove all the sanding spots from your stem. The shine will be better and more even if you get them all out.
This is a much nicer pipe than my first attempt. Keep at it and I'll look forward to seeing your future work.
Right. That'll be me being impatient and not wanting to overdo it. Was a bit concerned to ruin the pipe, cutting into the draught hole or that the tenon might break and haven't figured out a good way to support the stem. I watched a video on button shaping today and will see how much a nail polish file will help with that.
So thank you for the feedback. I have already ordered a few pieces of briar for the next few tries.
Welcome David.
I don't have anything to add to the critique but I will say it's a very good first pipe.
Your second attempt at shaping the button is a huge improvement.
You're on the right track. Keep going.
Rodney
David, Welcome.
I am also new to this forum and new to the modern era. I made pipes back in the "70's freehand era", but only recently resumed, having only touched briar with malice aforethought for the first time in 40 years back in Dec 2015.
I can offer some of what I am re learning (and learning). If it is too basic, I hope I don't offend you.
First of all, that is a great pipe for a first effort, and if that is a hand cut stem, you are way ahead of me there- well done! I also like your treatment of the top of the bowl- the thickness and bevel are nice and even.
Having said that , I will address what I am thinking about your pipe.
1) I spend the largest amount of time working a shape with 100-120 grit paper and hand sanding. Some the guys here on this forum are experts with the french wheel and probably spend significantly less time , proportionately, than I do. I will hand sand, with pads made of an old dog's toy (Kong Ball {urethane, I think,~5 mm thick}) until the surface is smooth and I am satisfied with the contour. Patience and persistence with a strong light from the side will reveal lumps , irregularities in thickness. etc., and you can also sometimes feel a flat, high spot or depression that is unintentional. If you are at a later stage of sanding, staining or even polishing and find something you missed, don't hesitate to go back to 100-120 grit paper and straighten it out, do a good touch up and then back up through the stages. Trying to change a contour, get out deep scratches like those left by your shaping disc, flatten a high spot etc are exercises in frustration unless you use a coarse enough grit.. Subsequent sanding stages are only to get out the scratches from the previous grit. When you are done with the 100-120 grit, your shape should be essentially done. All subsequent steps are finishing.
2) A poker looks simple, but takes a good eye and hand (and patience) to get right. The "wasp waist" is a nice treatment of the shape but it needs some thought. I think that it should be relatively subtle. The transitions at the top and bottom of your bowl involve too abrupt a transition and are a little jarring.( Edit. On review, it looks like you got it right for most of the bowl except for the left rear-were you trying to sand out a out a flaw?)§ Smooth those out so that there is no abrupt change of direction from mid body to lip. (Be careful with the pinching in, you still need enough briar to keep from scorching the outside).
I think the bottom of the bowl is interesting but overdone and unnecessary. I see that you did that to bring out some of the grain there. Maybe it's the treatment of the lower posterior bowl that doesn't work for me. Briar has a unique beauty that is best displayed, I think, with simple shapes. Complicated stuff like the bottom treatment of your bowl is distracting from that beauty.
It can be helpful to make your self some cutting guides from plastic. In this country, this plastic is used for milk containers, etc- I get mine from kitty litter containers. Straight edges, circles of various diameters, and subtle curves can be custom made for each shape that you are cutting or you can use them generically because even if the shape doesn't exactly conform to your pattern, you can still tell if there is an unwelcome divergence.
3) Lastly, I think that your beautiful hand cut stem may be proportionately a little long. I think that it could also benefit from comparison to a pattern/straight edge so that you can pick up and deal with any waviness. (a shorter stem is easier to work in this regard).
This is my first foray at pontificating in the Gallery, I hope that you don't find it too basic or offensive. I do have a pipe in the works that I think, barring any disasters (I split 3 shanks yesterday), I will post for critique in the next couple of weeks. Then you can take your shots at me.
By the way, I served in Germany in the US Army in the 1960s before the Wall came down, and my last name is German (but 4 generations in the US).
DocAitch
"Hettinger, if you stamp 'hand made' on a dog turd, some one will buy it."
-Charles Hollyday, pipe maker, reluctant mentor, and curmudgeon
" Never show an idiot an unfinished pipe!"- same guy
thank you very much for taking the time to share your thoughts on this pipe and for your suggestions.
I'm close to finishing the second pipe which will be much like this one, more to see whether I can reproduce a shape than that I think it's a particularly nice shape. I knew I would be even more impatient and make more mistakes, but better to get it over with right away.
I got me a few more grits of sandpaper and used a nail file for parts of the sanding and then also in combination with a piece of sandpaper. That worked well, I think. I'm also a little concerned about the minimum thickness, which will be a bit over 6mm. I actually had a plastic shape for the curve, but didn't use it much. You're right about the length of the stem, the pipe is too long to fit in a standard pipe bag.
I plan to make a few classic shape pipes next to get a bit more practice with the processes and the tools I use. As I said, I'm not using any power tools, so I have to figure out how to best use a chisel for shaping and a card scraper with briar, bore a straight hole through the stem with a hand drill and things like that.
Even better that you did that all with a limited number of hand tools.
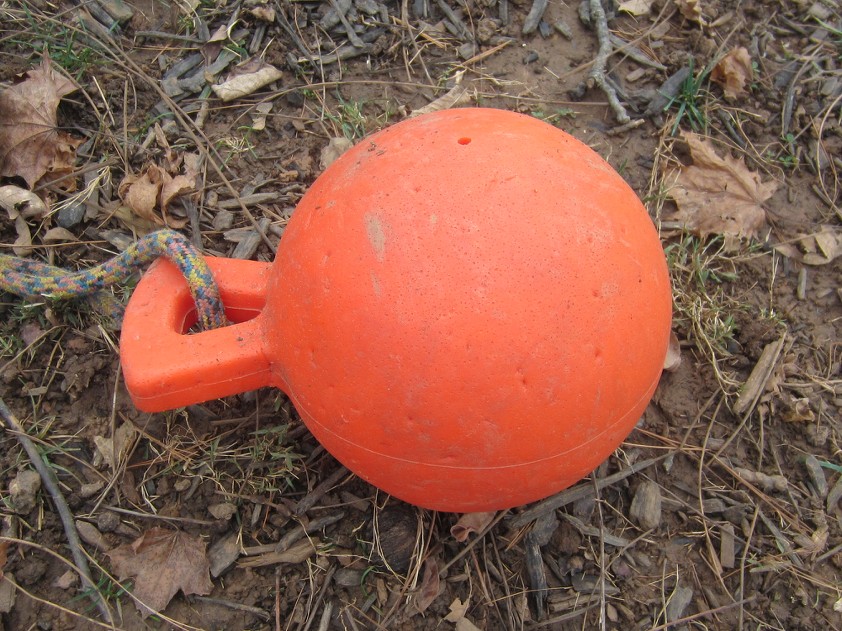
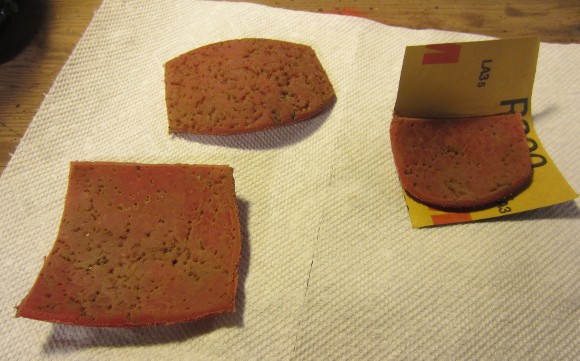
I do highly recommend obtaining some material like I use for sanding pads. The material that I use is salvaged from a large ball (~25cm diameter) which is made of a moderately firm plastic material ( the manufacturer, Kong! Says"durable rubber")
It can be cut with shears and the edge rounded a bit with coarse sand paper.
It is firm but flexible and is way better than any other pad material that I've used.I will post a photo when I get to my other computer.
Good luck with your next pipe. I was sanding the one that I am going to present here tonight but decided to attempt a hand cut stem, so it may be delayed.
DocAitch
"Hettinger, if you stamp 'hand made' on a dog turd, some one will buy it."
-Charles Hollyday, pipe maker, reluctant mentor, and curmudgeon
" Never show an idiot an unfinished pipe!"- same guy
This is the stuff. I used dowels and folded up cardboard in the past, but this stuff really does everything I need, and I feel that it is less strain on my hands.
New Kong ball ~$25
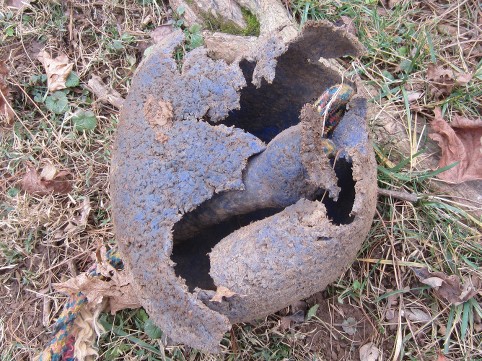
Well chewed old ball
Pads, can be sanded and shaped, are convex on one side, concave on the other. I round the edges with 60 grit paper.
I'm not sure if there is an equivalent purpose made product, but this stuff is free after the dogs are done.
DocAitch
"Hettinger, if you stamp 'hand made' on a dog turd, some one will buy it."
-Charles Hollyday, pipe maker, reluctant mentor, and curmudgeon
" Never show an idiot an unfinished pipe!"- same guy
Agnoeo, thanks for sharing! I think your pipe came out great for a first try! Using only rasps and files for shaping is long hard work. I used the same method for my firstpipe (and also displayed it on the same Mac-Baren Navy Flake tin!) http://pipemakersforum.com/forum/viewto ... 18&t=10430
I suggest buying some tools to help with sanding. If you don't want to spend much money, buy any old bench grinder and get a set of buffing wheels and a sanding pad. You'll cut your time in half! Here's a link to the part I just picked up: http://www.amazon.com/gp/product/B00D3M ... ge_o00_s02