New billiard and critique needed

Want to show you work to the world? Want a place to post photos of your work and solicit the opinions of those that have gone before you? Post your work here.
Post Reply
User avatar
GbpBulgaria
Posts: 78
Joined: Thu Nov 23, 2006 8:00 pm
Location: Sofia/ Bulgaria
Contact:

New billiard and critique needed

Post by GbpBulgaria »

Hello everybody,

I am holding on to make classic shapes – best choice for studying the shape is Billiard and this is my last creation.
After, I don’t know how many, attempts to make a good billiard, as good as I like it, this is the best done by me so far. So, I need your opinion especially regarding the form and the interpretation.
Well, it is not a classic Dunhill like billiard, but as I love long shanks it is a little bit prolonged.
Overall length 14 mm
Height – 44 mm
Chamber diameter – 19 mm
Deepness – 38-39 mm
Stem is hand cut vulcanite with Teflon/Delrin cone. (Please ignore the dust on the stem – on the pictures it is not cleared after buffing).
Time for finishing: from project on the block to the finished pipe – about 8 hours.
Note that I have started on the lathe facing the shank and drilling the mortise, all other work was on sanding wheel, belt and by hand, drilling inclusive. The finish is experimental for me – black dye as a base – buffing, sanding 320 and 400 – walnut stain, buffing sanding 400 and 600 grits. The walnut stain was almost removed.
Briar is Algerian Cirta plateau about one year old in my workshop. To my regret the pattern is somehow wild flame grain but there is only one small black dot on the side of the bowl, so I have new billiard in my rotation, replacing my favorite one which is totally broken and lost (well, this one smokes better and it is lighter.:lol:

Every constructive critique and recommendation is very welcome. :D

Best
George

Image
Image
Image
Image
Image
Image
Image
User avatar
Frank
Posts: 1341
Joined: Thu Nov 23, 2006 8:00 pm
Location: Southern California

Post by Frank »

Don't worry too much about the staining - that will improve with practice.

I'm guessing that the "ding" in the rim is a briar fault, so we'll overlook that.

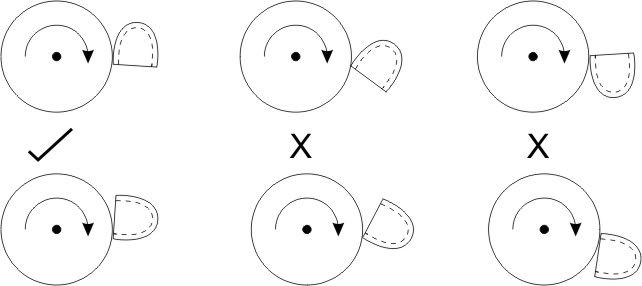
It looks like you have a slight forward cant to the bowl, which is correct. The shape of the bowl looks pretty good, but you've buffed away the sharp crisp edge of the bowl rim. When buffing the sides and top of the bowl, buff towards the outer rim, keeping the work surface as close to 90 degrees to the wheel rotation as possible. Hope that makes sense.

A couple of questions:
Was it your intention to make the shank "waisted", i.e. thinner in the middle? A classic billiard does not have a "waisted" shank. The sides should be straight.

Did you intend to make the shank/stem junction wider than the shank/bowl junction? A classic billiard actually has the shank stem junction very slightly narrower than the shank/bowl junction.

Judging from the close up picture of the bowl top, it's possible that you're over-buffing. Perhaps use less pressure against the wheel when buffing.
Regards,
Frank.
------------------
Grouch Happens!
People usually get the gods they deserve - Terry Pratchett
User avatar
GbpBulgaria
Posts: 78
Joined: Thu Nov 23, 2006 8:00 pm
Location: Sofia/ Bulgaria
Contact:

Post by GbpBulgaria »

Hey Frank
thank you for the response!
Frank wrote:Don't worry too much about the staining - that will improve with practice.

I'm guessing that the "ding" in the rim is a briar fault, so we'll overlook that.
I am sure about the stain. Actually this method is well known for me as i am staining almost all my pipes this way but now i have decided not to finish the process with all 4-5 stages but to try with only two as described. the result is not bad (for one of my personal pipes) but it can looks strange for a customer etc., like the pipe is not finished. By the way, after a week of use the stain become better and better to brown.
The 'ding' on the rim is from the 'original' plateau. left and right of the bowl. I have decided to leave it as it is naturally.
Frank wrote:The shape of the bowl looks pretty good, but you've buffed away the sharp crisp edge of the bowl rim. When buffing the sides and top of the bowl, buff towards the outer rim, keeping the work surface as close to 90 degrees to the wheel rotation as possible. Hope that makes sense..
The rim has never been with sharp edges. I wanted to be a little rounded but stopped rounding it because of the 'ding'. About the buffing towards the outer rim - yes it make sense but i am using large will mainly, and it is hard to buff the part of the bowl / shank junction except if i am buffing at diagonal (if this make sense) to the axis of the drilling of the bowl. OR to buff it square to the axis , e.g. with my finger in the bowl. If I am understanding right ypou mean 'towards' like I am sharpen a tool for example, am I right?
You can see on the picture 5 and 6 a whirl of the pattern. I don now why (it is not over buffed for sure) many of my blocks have the similar whirl - maybe they are brothers - but this happens at every second pipe I have made these days.
Did you intend to make the shank/stem junction wider than the shank/bowl junction? A classic billiard actually has the shank stem junction very slightly narrower than the shank/bowl junction.

Yes, this was an intended step. The pipe is for me not for a client and i like them thinner in this part. For example, I have my pipe in hand almost all the time i am driving the car (manual transmission, Bulgaria he he, you know) and i am holding the pipe between my fingers like cigar, it is comfortable :D but i need thin shank and bowl with thick enough walls. Moreover, i don't know why, i have a strive to make the stems thin in this part from the beginning of my pipe making about 6 years before.
Actually i have never wanted to make a 'classic' to the point billiard but to find the balance and proportion in my mind and to interpret the shape by hands. Even the angle between tobacco chamber and smoke channel of this pipe is wider that 90 degrees so this is interpretation for sure.

Best
George
User avatar
Frank
Posts: 1341
Joined: Thu Nov 23, 2006 8:00 pm
Location: Southern California

Post by Frank »

It sounds as if all the areas I pointed out were deliberate on your part for a personal pipe, so that's fine.
GbpBulgaria wrote:The rim has never been with sharp edges. I wanted to be a little rounded but stopped rounding it because of the 'ding'. About the buffing towards the outer rim - yes it make sense but i am using large wheel mainly, and it is hard to buff the part of the bowl / shank junction except if i am buffing at diagonal (if this make sense) to the axis of the drilling of the bowl. OR to buff it square to the axis , e.g. with my finger in the bowl. If I am understanding right you mean 'towards' like I am sharpen a tool for example, am I right?
Just in case you missed the point I was making, this sketch should illustrate it:
Image
Regards,
Frank.
------------------
Grouch Happens!
People usually get the gods they deserve - Terry Pratchett
User avatar
Sasquatch
Posts: 5147
Joined: Tue Jan 13, 2009 1:46 am

Post by Sasquatch »

That's a very Italian-looking billiard.

If you are trying to make a "classic" billiard, dunhill or peterson are good to copy. You find the harder lines, straigher edges. A more formal shape.

Move to Italian pipes, and things are fatter, smoother, more sweeping, and that is what your pipe reminds me of. I tend to like that sort of thing, but if you are looking for "classic" then you should be simplifying the shape, I would say.
User avatar
GbpBulgaria
Posts: 78
Joined: Thu Nov 23, 2006 8:00 pm
Location: Sofia/ Bulgaria
Contact:

Post by GbpBulgaria »

Hi
thanks for the sketch. It is really helpful to find out what you mean.

"Italian looking" hm, i don't know, maybe you are right Sasquatch.

Anyhow, I have a plan to make the shape more and more as i am not satisfied. I have Peterson 101 and will use it as a model this time and we will see.

Thank for the help!

Best George
Charl
Posts: 1901
Joined: Mon Jan 07, 2008 3:03 pm
Location: South Africa

Post by Charl »

Great to see some of your work again!
Except for all of the above that was mentioned, it seems to me as if your staining (or rather sanding) also needs to be adjusted. The spots of black stain that is left, make the pipe look unfinished. In my humble rookie opinion, you should rather sand more per grit to even out the stain, before advancing to another layer and finer grit. Does that make sense?
Keep them coming!
Post Reply