Bent Acorn from "Argentine Brown Ebony" (pictures)

Interested in making clay pipes, meerschaums, olive woods, or some other exotic material? Talk about it here.
Post Reply
pierredekat

Bent Acorn from "Argentine Brown Ebony" (pictures)

Post by pierredekat »

I just completed a pipe out of ... what shall I call it?... Argentine brown ebony? Caesalpinia Paraguariensis? Guayacán? Well, it is a wood with a real identity crisis, here in the US, I will put it that way.

There is a tree that grows in the Patagonian region of South America with the genus and species of Caesalpinia Paraguariensis. And its growth has been encouraged in South America much the same way that we encourage oak trees here in the US.

It is considered a "forage" tree by cattle ranchers in Argentina. So where we in the US might encourage the growth of oak trees as forage for deer, turkey, and squirrels, Argentine Gauchos encourage their native Caesalpinia Paraguariensis as forage for cattle.

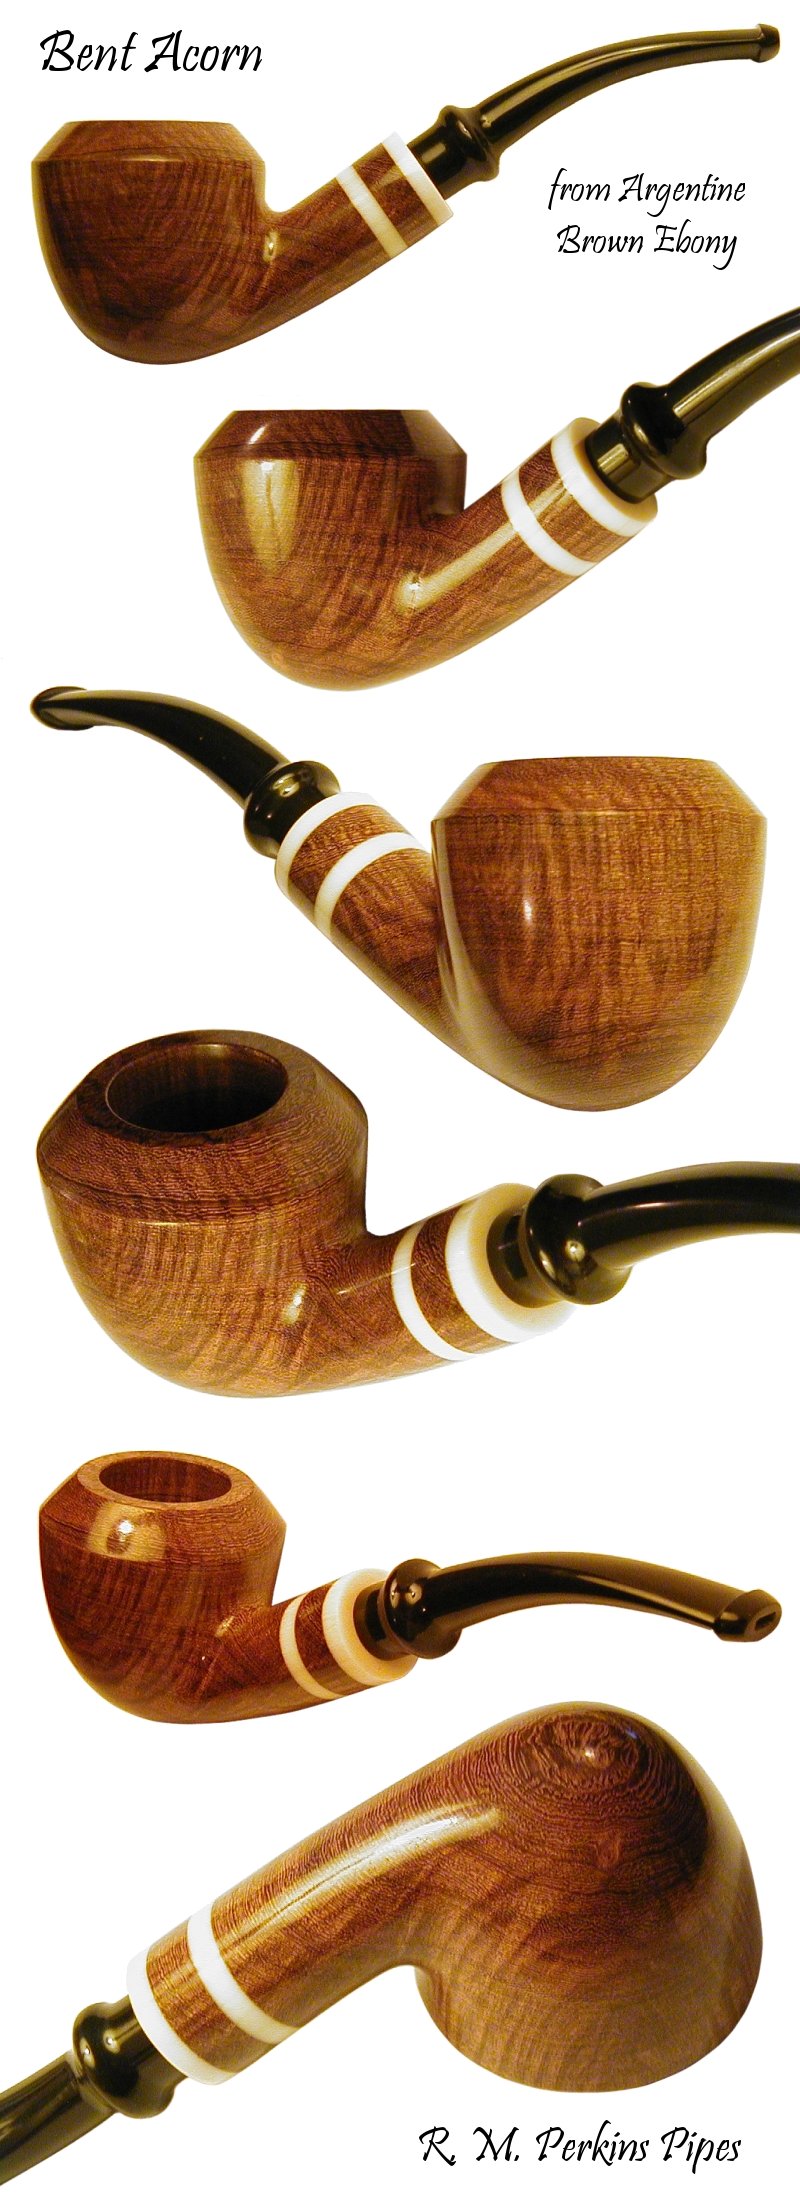
And the wood of Caesalpinia Paraguariensis is hard and dense, with a fine texture that polishes quite nicely. It also tends to have a lot of character: layers of brown and tan fibers sandwiched between layers of nearly black fibers, oftentimes interlocked in these rich, undulating patterns.

But like many woods from South America, there is a lot of confusion. For instance, there are three or four different woods called "brown ebony" coming out of Latin America these days.

And then there is the confusion that enters when the wood changes hands, and the people who are harvesting it are dealing with a dozen different species of timber, and they look at a stack of lumber, and they can not remember exactly what it was inside that stack.

So they sell the wood to the next guy, and the next guy sells it to the next guy, and by the time it makes its way into the US, God only knows what you are buying, exactly.

But apparently a few folks have recognized the superb qualities of the wood from Caesalpinia Paraguariensis trees and started calling it "Argentine Brown Ebony" to distinguish it from other "brown ebonies" from South America.

Oh, did I mention that Caesalpinia Paraguariensis is not even in the Ebenaceae family? "Argentine Brown Ebony" is about as close to being a true ebony as oak is. It is actually much more closely related to our mimosa and redbud -- being in the family Leguminosae -- than it is being related to ebony.

Yes, I know: confusion, confusion, confusion.

But I have pretty much concluded that, if you look for either "Argentine Brown Ebony" or "Caesalpinia Paraguariensis", chances are pretty good that you will find the particular wood I used to make the pipe below. (Be careful about terms like "brown ebony" without the "Argentine" part, and beware of simply "Guayacán", as there are several different woods being referred to as "Guayacán" these days.)

I purchased my lumber from NCWood on Ebay, but you can also buy it by the board-foot in 8/4 thickness from West Penn Hardwoods, Exotic Wood Group, and others.

If you have never dealt with green wood before, you will probably want to double-check that your Argentine brown ebony is kiln-dried. I personally have seasoned green lumber before with good results, but my method has generally involved sealing the ends with Elmer's glue -- or whatever else I happened to have handy at the time -- and waiting a few years. You may not want to wait that long, so I highly recommend buying kiln-dried lumber from a reputable source like West Penn Hardwoods, etc.

Like I mentioned earlier, the wood is attractive, but you really have to move it around in the light to get the full effect.

It is dense. Argentine brown ebony's density is somewhere in the range of 1,180 kg/m3, which means that it will likely sink in water. Now, I like a heavier pipe because that extra mass makes for a cooler smoke. But a lot of guys like a lighter pipe, so if low-weight is part of your design criteria, you will probably want to stick to a less dense wood.

Argentine brown ebony is hard, but it is not so hard as to be difficult to work. I turned the pipe below on my little lathe with no problem, I will put it that way. But you do get a feel for the wood's fibrous nature, when compared to briar, as you turn it.

You will need sharp chisels, but you will also want to plan on doing some sanding to work your way down to final dimensions. This is more because the fibers seem a little torqued after being turned, and you will get a much better 3-D grain effect if the fibers are in a more natural state.

I do not know if I am explaining it correctly, but hopefully, if you turn some of this stuff, you will see what I mean. It cuts well, but it likes some sanding afterwards.

It is a fibrous wood, but it also has a fine texture. If I had to put it into a context, I would say it is somewhere in the range of, say, maple; Argentine brown ebony is not nearly as fine textured as briar, but it is definitely smooth enough to wax it and be done with it.

And this may or may not be of interest to anyone except for myself, but CITES says that Caesalpinia Paraguariensis is "assumed not to be in international trade." So virtually nobody is using this stuff currently.

Therefore, if we make a few pipes out of Argentine Brown Ebony -- along with a few knifemakers using it for handles and penturners making a few pens out of it -- we are not going to turn Argentine Brown Ebony into the next Brazilian Rosewood. There should be plenty to go around for a good, long time.

I guess I think about that kind of stuff sometimes: sustainability. I like the idea that this wood can probably be used sustainably.

Argentine brown ebony has no discernible smell when it is dry, and it smokes quite well.

I have put several half-bowls of tobacco through the pipe pictured below, and I could not taste anything out of the ordinary, which is strange, because most of the wood pipes I have broken-in had at least a little wang to them on at least a puff or two.

So whatever you choose to call it -- "Argentine brown ebony" or "weird South American coffee-brown kaleidoscope wood" -- Caesalpinia Paraguariensis offers a lot of promise as a pipe wood, I think. It can pack a lot of character into something so small as a smoking pipe. Or it can be purchased by the board-foot and turned into a pipe with dimensions we could never even dream of achieving with briar.

Cheers.

Image
User avatar
Nick
Posts: 2171
Joined: Thu Nov 23, 2006 8:00 pm
Location: United States/Connecticut

Post by Nick »

Really nice!! I love the grain. It almost looks like morta. Great shape and nice shank adornment too.
pierredekat

Post by pierredekat »

Thanks, Nick. :D
User avatar
hazmat
Posts: 797
Joined: Thu Nov 23, 2006 8:00 pm
Location: Harrisburg, PA

Post by hazmat »

That is a pretty pipe. I like the different colors in the wood.

How do you get such nice photos???
User avatar
Frank
Posts: 1341
Joined: Thu Nov 23, 2006 8:00 pm
Location: Southern California

Post by Frank »

Very nice looking pipe, Rob. I like how you always manage to get the centre of the grain spot on the heel of the bowl.

Is it OK if I add the image to the "Alternative woods" http://pipedia.org/index.php?title=Main ... Pipemaking section of Pipedia? Thanks.
Regards,
Frank.
------------------
Grouch Happens!
People usually get the gods they deserve - Terry Pratchett
pierredekat

Post by pierredekat »

hazmat wrote:That is a pretty pipe. I like the different colors in the wood.
Thanks. :D
hazmat wrote:How do you get such nice photos???
And thanks again. :D I guess, basically I start by taking lots of pictures.

It's so difficult to try to take a single, perfect picture because even if you have everything set up just right, you'll get a weird flash blur or whatever.

So basically, I just start snapping away. Like for this pipe, I probably took somewhere around 100 pictures.

Then I went through and deleted about 50 of them because they were so blurry.

And then I went through and picked out the best 10.

And that's when I really got into splitting hairs with the pictures: How is the color balance in this picture, compared to that picture? How sharp are the lines in this picture, versus that picture? And so on.

Then, I white-out the background. It's hard enough to catch the light right and get a good focus, the angle, etc., without having to worry about shadows on the background.

So I just white everything but the pipe out, assemble the whited-out pics into a single page, and voila.

It sounds insane to put that much work into photographing a freakin' pipe, but, you know, it's the pictures that actually sell your pipes.

And since I'm really just now starting to get my website up and running, and I need at least a few decent pictures, and I am really excited about this wood, etc., I just plugged away at it until I had something I was happy with.
pierredekat

Post by pierredekat »

Frank wrote:Very nice looking pipe, Rob. I like how you always manage to get the centre of the grain spot on the heel of the bowl.

Is it OK if I add the image to the "Alternative woods" http://pipedia.org/index.php?title=Main ... Pipemaking section of Pipedia? Thanks.
Thanks, Frank. Oh absolutely, be my guest. Thanks for that, too. :D
User avatar
hazmat
Posts: 797
Joined: Thu Nov 23, 2006 8:00 pm
Location: Harrisburg, PA

Post by hazmat »

Are you taking the pictures against any type of background? You mentioned "whiting it out". I'm not sure if you mean through the use of image editing software or if you have some type of setup that you use specifically for getting your pictures.

For the pipe I just posted, I got a large box and cut off the top and front panels. Then I painted the interior flat white. I didn't do it with these photos, but I intend to put a piece of posterboard against the back and bottom that will create a subtle rounded transition instead of the hard right angles of the back of the box. I then used white tissue paper to diffuse the lights I situated around the top of the box to light the pipe. As you can see in the images, it didn't work quite as well as I had hoped. The pictures are a bit yellowish. I know squat about photography, so I'm just learning. I did take a LOAD of pictures and the four posted were the best four of about eighty-five!!! :shock:
pierredekat

Post by pierredekat »

hazmat wrote:Are you taking the pictures against any type of background? You mentioned "whiting it out". I'm not sure if you mean through the use of image editing software or if you have some type of setup that you use specifically for getting your pictures.
A little of both. I shoot the pipe with a white paper background, and then I use The GIMP to erase or paint-over the shadows.
hazmat wrote:For the pipe I just posted, I got a large box and cut off the top and front panels. Then I painted the interior flat white. I didn't do it with these photos, but I intend to put a piece of posterboard against the back and bottom that will create a subtle rounded transition instead of the hard right angles of the back of the box. I then used white tissue paper to diffuse the lights I situated around the top of the box to light the pipe. As you can see in the images, it didn't work quite as well as I had hoped. The pictures are a bit yellowish. I know squat about photography, so I'm just learning.
Yeah, that sounds like you have a pretty good setup, there. My setup is pretty simple, really: a white piece of paper and a lamp overhead with one of those energy-saving fluorescent bulbs in it.

I always try a few pictures using a flash, but I have yet to get anything I was even remotely satisfied with out of it. Fortunately, my older Olympus digicam has an ISO setting of 500, which allows me to capture a few low-light pictures without a flash.
hazmat wrote:I did take a LOAD of pictures and the four posted were the best four of about eighty-five!!! :shock:


Yep, that sounds about like what I'm doing. :lol:
User avatar
kbadkar
Site Supporter
Posts: 786
Joined: Mon Mar 26, 2007 6:48 pm
Location: Los Angeles

Post by kbadkar »

Hazmat wrote: The pictures are a bit yellowish.

If you have a digital camera with goodies, you should be able to adjust your white balance so the white background is true white. Some cameras allow you to take a picture of the white background and the camera will adjust your white balance accordingly. The simpler cameras will have presets (icons) for like sunny days, fluorescent lights, cloudy days, etc. Try these presets until the background is as white as it will get. If you have Photoshop, to make it simple, you can just click "auto levels" under the "image" and "adjustments" tabs. This finds your whitest and blackest points and "creates" a true white and a true black and "scales" everything between.
User avatar
hazmat
Posts: 797
Joined: Thu Nov 23, 2006 8:00 pm
Location: Harrisburg, PA

Post by hazmat »

kbadkar wrote:Hazmat wrote: The pictures are a bit yellowish.

If you have a digital camera with goodies, you should be able to adjust your white balance so the white background is true white. Some cameras allow you to take a picture of the white background and the camera will adjust your white balance accordingly. The simpler cameras will have presets (icons) for like sunny days, fluorescent lights, cloudy days, etc. Try these presets until the background is as white as it will get. If you have Photoshop, to make it simple, you can just click "auto levels" under the "image" and "adjustments" tabs. This finds your whitest and blackest points and "creates" a true white and a true black and "scales" everything between.
Awesome information here. I don't have a camera, I borrowed a friends. It's somewhat high-end. I imagine the white balance can be adjusted as necessary. These were the first 'display' pictures he's taken with it to my knowledge, so he may not know what options are available in that regard. I'm going to see if he'll let me get the user's manual so I can have a read through it. I have another friend who's a pro photographer, but I don't know that I want to pay cash for the service and he doesn't smoke a pipe so I can't make a trade.

Thanks to both of ya!!!
pierredekat

Post by pierredekat »

hazmat wrote:I'm going to see if he'll let me get the user's manual so I can have a read through it.
If you have the brand and model number, there's a real good chance that you can download a .pdf copy of the user manual from the manufacturer's website. I know we did that with a used video camera we bought my Girlfriend last year.
mattw
Posts: 8
Joined: Sun May 06, 2007 2:25 pm

Post by mattw »

Also, hazmat, don't know if you have/can use Linux, but Rob mentioned using "The Gimp" - it is a freeware image editing program that (in my opinion) comes very close to being as good as Photoshop (and is better in a lot of ways). It is pretty user-friendly, is free, but only runs in Linux. If you have the option - it is a great program and you can do almost anything to pictures with it. Worth looking into if/when you are doing a bunch of pics.
pierredekat

Post by pierredekat »

mattw wrote:Also, hazmat, don't know if you have/can use Linux, but Rob mentioned using "The Gimp" - it is a freeware image editing program that (in my opinion) comes very close to being as good as Photoshop (and is better in a lot of ways). It is pretty user-friendly, is free, but only runs in Linux. If you have the option - it is a great program and you can do almost anything to pictures with it. Worth looking into if/when you are doing a bunch of pics.
Actually, they have versions these days ported to run on Windows and MacOSX.

I think that's one of the coolest things about open source stuff is that they're not limited by political BS to working on one particular operating system. All they need is a few people who are interested, and they can port it to pretty much anything.
User avatar
hazmat
Posts: 797
Joined: Thu Nov 23, 2006 8:00 pm
Location: Harrisburg, PA

Post by hazmat »

I use Photoshop at home, but don't have it on my office computer, which is where I "edited" the posted pics. I put them all on my home computer last night and will be playing with them this evening to see if I can get them any better. I'm also going to try to get some better shots over the weekend. Thanks again, guys!

Matt
sprangalang
Posts: 38
Joined: Fri May 18, 2007 4:40 pm

Post by sprangalang »

Real nice looking pipe. I love the grain on that wood. Nice pics BTW. I want to take pics like that.
-Jeff
pierredekat

Post by pierredekat »

Thanks, sprangalang. :D
Post Reply